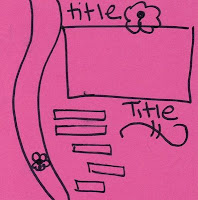
 Can you believe it??? It's been 10 weeks of Tuesday Tutorials This week's layout was inspired by a colour challenge from SPCC. Click on the photo for a link to the site.
 Samantha, the scrapmaster, who runs SPCC also has her own blog which you can link to by clicking the picture of the pink layout. She posts scrapbook layout challenges on her personal blog Scrapmaster's Paradise. Anyway, I digress, back to the tutorial.
STEP 1 LAYOUT:
This was easy as I had already chosen the one above.
STEP 2 COLOURS
The first thing I did was get out my ink pads of the 4 challenge colours and put them together on my work table. What struck me immediately, was how vibrant each colour looked against the beige colour of the plastic ink pad container. I immediately thought of using Very Vanilla with these colours. Then I needed to decide which of these colours was going to be my background colour. I had already decided that I wanted to use the Circle Circus stamp set, so I got out some Very Vanilla cardstock and stamped out each stamp in the 4 colours. I punched them all out with my various circle punches and then lay them each out on paper to decide what would be the best background. Chocolate Chip was a clear winner. With colour and layout decided, the next step was...
STEP 3 PHOTO
Oh yeah, I actually started a layout with no idea what the photo was going to be. Now normally I always choose my photo, and then pull colours from the photos for the layout, but this time I went in a completely different direction. I actually do have a box of photos that I have printed off, but never scrapped and in this box I had this gorgeous photo of my hubby's brother and his sister's son (my nephew). I could have enlarged and reprinted this photo because I usually scrap on a 12x12 size. But those of you who have been following me for some time know about my collection of 8x8 shadowboxes that I regularly change. So I decided that it was time for an 8x8 layout and didn't enlarge the photo. Instead I cropped it down a bit to fit the layout. Mounting the photo on Kiwi Kiss was a given as the trees in the background are the same colour. And the photo itself looked really uninspiring on Chocolate Chip.

I lay the circles out in a sweeping arc like on the layout and popped a few of the smaller ones up on dimensionals. The scalloped medalion was made by layering several of the circles and adding a filigree brad to the centre. It was also popped up on dimensionals. The titles were rub ons from my collection and I used a white signo pen to draw the cloud and write the journaling. Below you can see the photo in it's shadowbox.

Stamps: Circle Circus. Ink: Baja Breeze, Rich Razzleberry, Kiwi Kiss. Paper: Very Vanilla, Chocolate Chip, Kiwi Kiss. Accessories: Various Circle punches and scallop circle punch. Greatest Moments rub-ons, Signo Gel pen.


WOW that is awesome!!!!!
ReplyDeleteHugs,
Samantha
SP Color Combos Creator
I love this LO! Great job witht the colors and sketch!
ReplyDeleteWhat an amazing layout, I will deffinatly be CASEing this one for my collection!!
ReplyDeleteLove that layout!
ReplyDeletethis layout is fantastic!
ReplyDeleteVery nice!!
ReplyDeleteWow this is super cute !!
ReplyDeleteADORABLE!
ReplyDeleteBeautiful! I love the circles and it looks fantastic in the frame!
ReplyDeleteI love this LO! The circles going down this side are awesome!
ReplyDeletegreat ideas... great work..thanks for sharing.
ReplyDelete___________________
Rozydesouza
Entertainment at one stop