Saturday, June 4, 2011

Budding Bustier???

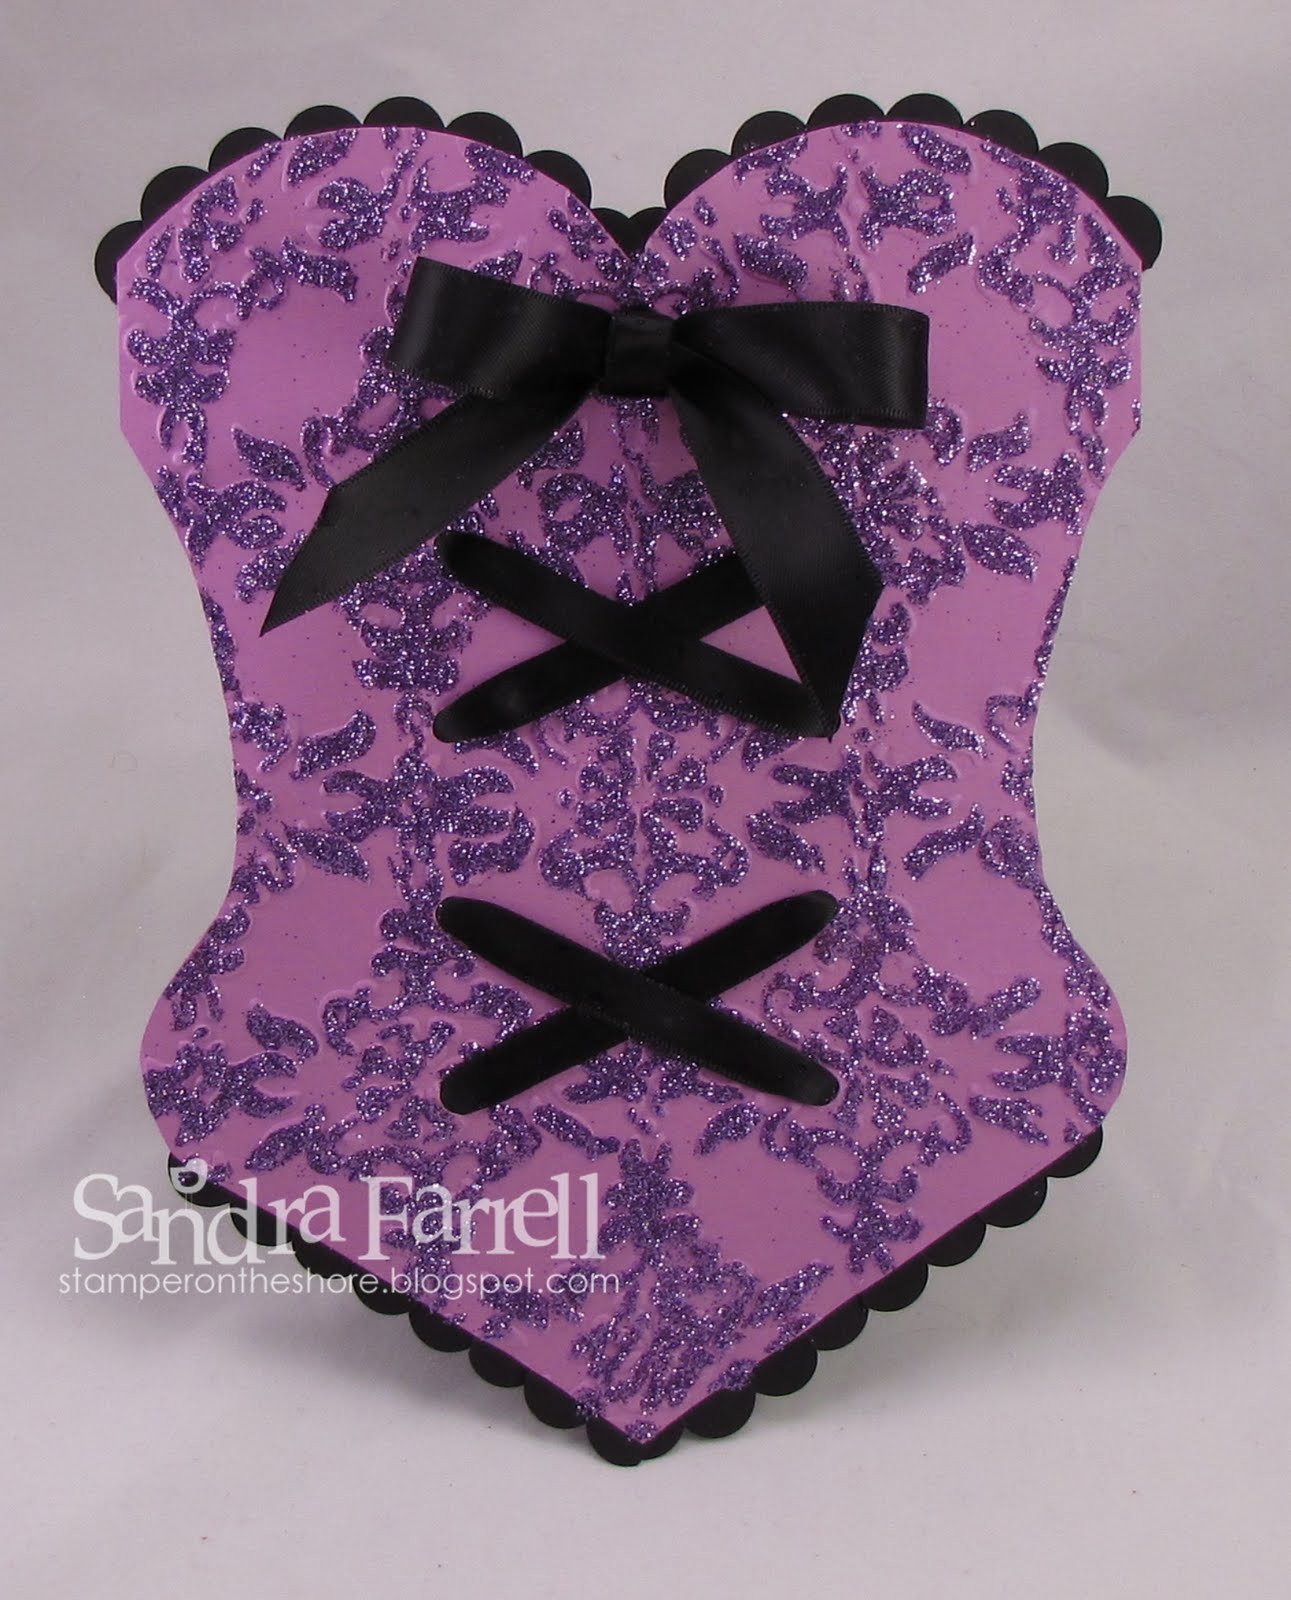
   I was going to entitle this post 'girls gone wild' but then realized that I wasn't talking about girls - when you are over 40 years old, you can hardly be considered a girl - and really, how wild can a Stagette be when the bride in question doesn't drink alcohol??  I decided to make this bustier card to hold a gift card for a "love" shop here in North Vancouver.  It was for my future Sister-in-law's Stagette.  It was a Lingerie party/ stagette rolled into one, and I thought that perhaps I would let her pick out her own Lingerie - thus the gift card. 
    Now I have seen variations of this card over the years, but wound up making my own template.  First I googled 'cards bustier' and got a wonderful You Tube video which showcased a bustier card.  Then I got out my paper and came up with my own template.  Then I ran it through my Big Shot with the Vintage Wallpaper Textured Impressions folder.  Once that was done I used a two way glue pen to add the glitter to the embossed image - it isn't perfect, but I like the effect. The glitter is from my stash.
     I punched the holes with the crop-a-dile.  Then I got out some Basic Black Satin ribbon and folded it in half.  I used sticky tape to hold it in half.  Next I threaded it through the holds and secured it on the back with more sticky tape.  The top ribbon was not folded in half, and tied into a bow. 
     The lacy trim was made using the largest scallop circle punch.  I then cut out the middle, and unrolled it to make this lacy edge - tutorial to be posted soon.  In fact, maybe I'll get organized enough to post up one for the whole card - we'll see...
     Finally I made a smaller cut out of the shape and formed a pocket to slip in this gift card.  Here's the final image.

Friday, June 3, 2011

Bunny Hat Fun!

 I sat down yesterday feeling inspired to create.  I really wanted to use my new paisley petals DSP, so I started looking for a sketch.  When I came upon this week's sketch at Create with Connie and Mary, I decided it looked like a scrapbook layout, so then I pulled out this photo of my kids taken this past Easter.  Well, then I thought, that perhaps, some pastel colours would be really apropriate.    The strips on the left were made using My Digital Studio.  The nice thing about this is that I used the align tool in MDS to made sure I got a perfectly spaced pattern with each stamp.

Wednesday, June 1, 2011

Stampin Royalty Challenge #74


I am horribly late with my posts this week.  My apologies.  It's been a crazy week - what can I say?  This week we have a fabulous colour challenge for you at Stampin' Royalty  Click here to check out the fabulous samples made by the design team.  This week I pulled out a soon-to-be retired hostess set - Birthday Bakery.  It's the first time I used this set, but I definitely will using it again.  It's so darned cute!  In fact, one I had stamped out all the images I decided that I needed to make 2 more cards in order to use them all up.

Friday, May 27, 2011

Still Sew Sweet

These are pages I made a few months ago.  They are part of a set of 4 which I plan to put up in my new scrap room.  Click here to see the other two which I posted a while ago.
I used up my Sweet Stitches DSP, Fabric Designer Brads, and Designer Big Buttons. I coloured the chipboard with coordinating ink. I used a few glimmer brads, and Ice Cream Parlour buttons from Sale-a-bration. The buttons were 'stitched' using thin slices of paper. The orange stitching was made with a needle and some embroidery thread that I found in my stash. 

Wednesday, May 25, 2011

Stampin Royalty Challenge #73


This week we have a fabulous sketch challenge over at Stampin' Royalty.  Hop on over to see the fabulous samples from the Design Team.   I was excited to get to this card because I finally had a chance to break open my sneak peek Paisley Prints DSP from the upcoming 2011-2012 Stampin' Up! catty.  I love, love, love the colours in this paper.  I used Cherry Cobbler, Old Olive, Pumpkin Pie, and Not Quite Navy when I coloured in the stamped image.  I used the Birthday Bliss Stamp Set and cut out the label and mounted it on an oval punched out from Whisper White cardstock, with the Wide Oval Punch.  I popped it up on dimensionals.  I used whisper white satin ribbon for the bow and addd a cherry cobbler button to finish it off.

Tuesday, May 24, 2011

Connor Turns 5 with Colour Q 86


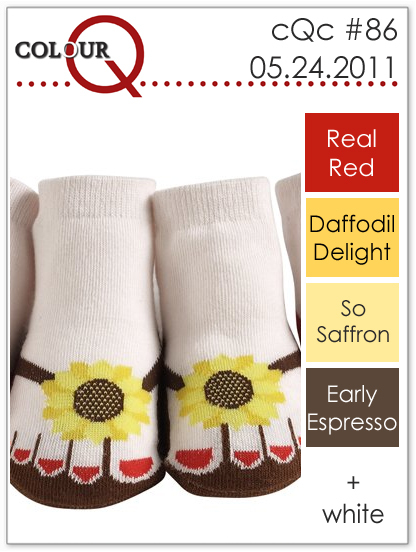
This week we have a great challenge over at Colour Q.  Hop on over and check out the fabulous samples from the Design Team. 
How do you successfully create a multiple photo layout.  I used the nine photo template in My Digital Studio, and then deleted one of the middle photos and moved them around so create a balanced layout.  I started with Early Espresso background paper and then added the Alphabet Letterpress in So Saffron.  Then I reduced the opacity so that it's barely visible.  I decided to add some DSP for the background, so I used the Notable Calendar Designer Paper.  Connor's name was spelled out with the Broadsheet Alphabet Stamp Brush set.  I also added ribbon, pearls, and stitching to finish it all up.

Monday, May 23, 2011

A Quick Card

Here's a quick card I whipped up using the hostess set Birthday Bakery.  I pulled out some retired Wild Wasabi DSP for the background.  The tag image was stamped in Staz-On on Watercolour Paper.  Then I used Stampin' Write Markers and an Aquapainter to colour in the image.  I punched out Daffodil Delight cardstock with the small tag punch and adhered the image to it.  I added some Very Vanilla Grosgrain  and then popped the whole thing up on Stampin' Dimensionals.

Friday, May 20, 2011

Soft Subtles and a Sketch


Today I had the day off!  It was a nice quiet day with no children and no hubby. I did a bit of unpacking and then decided to sit down in my new craft room and create.  This is what I came up with.  I used the sketch from this week's Pals Paper Arts, and I used the colours from Just Add Ink.  I also submitted this into the butterflies challenge at Less Is More.

I dusted off a set I haven't used in a while - Fabulous Friend.  I stamped the butterfly and the frame in each colour and then carefully cut them out.  I folded the butterflies and attached them in the middle.

Wednesday, May 18, 2011

Stampin Royalty Challenge #72

Please forgive me for bragging.  But I really do think they are the cutest kids in the world.  This week at Stampin' Royalty we have a recipe challenge.  We'd love to see your projects featuring birds to celebrate Spring.  My page was made using the recently retired Botanical Gazette paper which has this page that features these two cute robins.  The blue eggs are a real giveaway.  The letters are from the Broadsheet Alphabet letter brush set.  I created the title with My Digital Studio and printed it out.  Then I cut it out and attached it to the page.  The bees, butterflies and birdcage were stamped out on very vanilla and then cut out and popped up on dimensionals.

Sunday, May 15, 2011

Sew Suite Mother's Day Swap

This fantastic swap was MY FAVOURITE swap from Vancouver Regionals.   It was made by Kim Lee.  Check out her blog  http://www.kimspapercandycreations.blogspot.com/
I love how the image was stamped on vellum to create a two toned look.  Below you can see the image when I lifted the vellum up.  This card is went to go to my Mother In Law from my hubby.  Thanks Kim for designing such a fabulous card.

Wednesday, May 11, 2011

Stampin Royalty Challenge #71

This week at Stampin' Royalty we have a theme challenge.  In honour of the past mother's day, we'd like a project featuring Mom's.  Anything from a Mother's Day card, to a scrapbook page, or any other papercrafting or digital project would be fabulous to see.

Tuesday, May 10, 2011

Colour Q Challenge #84


This week at Colour Q we have a fabulous colour combo yet again.  I just love the earthy tones in this combo.  I decided to use the photos from my recent trip to Palm Springs.  I also used some new dowloads from Stampin' Up! that are available in the latest Summer Mini.  Hop on over to Colour Q to check out the fabulous samples from the Design Team.

Saturday, May 7, 2011

Vancouver Swaps!

This cute little swap is from Vancouver Regionals - wow did I get fabulous swaps.  Unfortunately this swap does not have a name on the back so I can't credit the creator.  I know it uses the Build a Blossom set and coordinating punch.  The large Scallop circle die for the Big Shot and the First Edition DSP.

Tuesday, May 3, 2011

It's the first challenge of the month, which means its a colour challenge over at Stampin' Royalty.    Check out the fabulous creations by the design team. 
For this page, I pulled out some photos of my daughter.  Most of the challenge colours are in the photos, so I went from there.  I used my digital studio, and some new digital papers and stamp brushes from the latest Summer Mini. 
The Fun Stuff:
1.  Colours - Real Red, Wild Wasabi, Pacific Point, Rich Razzleberry
2.  Stamp Brushes - Fabulous Florets, Sunset Serenade
3.  Designer Paper - Beyond the Garden
4.  Accessories - Rich Razzleberry polka dot ribbon, Circle Punch, Square Punch

Monday, May 2, 2011

We all reach up high...

OK, I know that I'm scrapping waaaaayyyyy too many photos of Teagan in her toddler dance class, but I just can't get enough of those adorable little girls all in their little tutu's.  Lately, Teagan has decided to 'assert her indepence' like the good tough Viking that she is and has started refusing to participate.  So I had to include a photo of her sitting while the rest of the girls participated.  The poem on the right is the words to a song that Miss Marnie (the instructor) sings with them every week.  It's just tooooo stinkin' cute.  Last week, I actually had to join in the class and dance with her to get her to participate.  It wasn't a pretty sight - I'm a hockey player, not a ballerina remember?


Saturday, April 30, 2011

Go Canucks Go!!!

So I'm a hockey fan.  In case you haven't figured that out yet.  I also play hockey on two women's teams, but that's a story for another day...   Two weeks ago we were lucky enough to get tickets to round one of the Stanley Cup Playoffs.  We went with my brother and his wife and had a complete blast.  To top it all off, the boys won and everyone was in a great mood after the game.  I put this page together using My Digital Studio.  The title is the Playdate stamp brush set "letters".  I matched the blue to colours in the photos and added a white drop shadow to the letters.

Friday, April 29, 2011

Vancouver Swaps!

This fantastic swap was made by Jenilee Pauls.  The colours are Old Olive, Whisper White, Night of Navy.

Wednesday, April 27, 2011

Stampin Royalty Challenge #69


So it's Wednesday, and we have a Sketch Challenge for you over at Stampin' Royalty.  Please hop on over to see what the Goddesses have created for you.  I absolutely love to see all the different takes that people have with one sketch.  For me, it was a simple decision to use the stamps and images that I did, but it was the colours that really stiumped me.  I really like Peach Parfait and Pear Pizzazz together, but I couldn't find a ribbon to really set it off.  I settled on this retired Chocolate Chip grosgrain and a strip of White Satin ribbon.
The Fun Stuff:
1.  Stamps - Easter Blossoms, Notably Ornate
2.  Ink - Pear Pizzazz, Peach Parfait
3.  Paper - Chocolate Chip, Peach Parfait, Pear Pizzazz, Whisper White cardstock and Pear Pizzazz designer series paper.
4.  Accessories - Stitched Grosgrain ribbon from the Clearance Rack, Whisper White satin ribbon, Key tag punch - retired, Decorative Label punch, Button Bouquet, Stampin' Dimensionals.


Tuesday, April 26, 2011

Colour Q Challenge #82

It's Tuesday and that means another fabulous combo from Colour Q.  I made this page of my boys in Palm Springs using My Digital Studio.   I found the golf ball image online and used it as the letter O.  I usually start a page by pulling the colours from a photo, and when I do a colour challenge, I try to start with a photo that has the challenge colours in it.  This challenge really worked with this photo.  And the message???? Well I absolutely hate golfing, but everyone else in my family loves it.  So when we go to Palm Springs Brad golfs with my parents.  This year, Connor came along in the cart for a ride. 

Monday, April 25, 2011

Baby For You

This card was one that I originally created for my Artisan Award entries.  Artisan Award is a contest sponsored by Stampin' Up! for it's demonstrators.  Last year I entered and was a finalist!!!  That means that from over 400 or so entries, I made the top 30.  But the award only goes to the Top 10, so I decided to enter again this year.  Let me tell you that competition is tight, and I second guessed myself many, many, many times.  Thus, this card did not make the final cut.  This card didn't make it because I accidentally attached it on the background paper sideways.  Could you even tell??  Once I noticed, I just could not stop noticing it.  Besides, I cased this card from another blog, and it's supposed to be a contest all about creativity.
The Fun Stuff:
1.  Stamps - Party This Way, Printed Petals, For You Flower
2.  Ink - Rose Red, Baja Breeze, Early Espresso, Old Olive
3.  Paper - Whisper White, Early Espresso, Nursery Suite
4.  Accessories - Paper Piercing Tool, Circle Punches, Stampin' Dimensionals.

Sunday, April 24, 2011

Vancouver Swaps!

Happy Easter Everyone!  This adorable card was another swap from Vancouver Regionals in February.  I love, love, love it.  This card was made by the talented Brunhilde Poetsch.
The Recipe:
1.  Stamps - Easter Blossoms
2.  Paper - Perfect Plum, Pretty In Pink, Whisper White
3.  Ink - Basic Black
4.  Accessories - Stamp-a-ma-jig, Dazzling Diamonds, Signo White Gel Pen

Friday, April 22, 2011

T Ball Rocks!!!!

Just a quick page I whipped up on My Digital Studio.  I love how the colours in the paper match the photos so much.  BTW the paper is Celebrations

I still have hope...

If you understand what this logo means, you understand what I'm saying...
I still have hope boys - bring it home!!!

Wednesday, April 20, 2011

Stampin Royalty Challenge #68

This week we have a technique challenge for you at Stampin' Royalty. 
LET'S GET WET!!!!!! - pull out your watercolours and let's see what you've got!!!
I tried a few new techniques for me with this card.  I don't ususally fill the image with colour as I did with this image.  Now the secret to success with this card is the paper.  You need to use watercolouring paper to be able to manipulate the ink for full coverage  Secondly the grass was a variation on a technique I saw somewhere recently.  But more on that later.
So, I stamped the egg image on watercolour paper with Staz-On ink.   The water can bleed the ink on the image unless you let it dry thoroughly.  I'm pretty impatient once I start a card, so using Staz-On means I keep a crisp clean image.  Next I pulled out my Stampin' Write Markers.  I coloured in half of each egg and then 'pulled' the ink over the rest of the image.  The sky was a bit more difficult.  They key to watercolouring smoothly is to keep a wet edge.  I used a Tempting Turquoise Stampin' Write Marker to colour the top cm of paper.  Then I used an aquapainter to get all the ink wet.  Next I painted down the paper.  Going around the eggs quickly was a bit tricky, so I needed to go back over it several times to smooth it out. 
The grass is three strips of frayed ribbon.  The middle ribbon is Pear Pizzazz Seam Binding Ribbon, and the top and bottom ribbon is Old Olive Satin Ribbon.  I trimmed the top two layers to give them wavy edges so that the 3 layers really pop.
The Fun Stuff:
Paper - Watercolour Paper, Basic Black, Whisper White, Confetti White
Ink - Tempting Turquoise, Daffodil Delight, Melon Mambo, Rich Razzleberry, Tangerine Tango
Stamps - Easter Blossoms, Nature Walk
Accessories - Key Tag punch (retired), Decorative Label punch, Daffodil Delight, Pear Pizzazz, Old Olive Ribbon

Sunday, April 17, 2011

Vancouver Swaps!

This fabulous swap was created by Judith Thibault
1.  Stamps - Swe Suite, Short and Sweet
2.  Ink and Paper - Early Espresso, Soft Suede, Crumb Cake, Very Vanilla, Pear Pizzazz, Daffodil Delight, Peach, Parfait, Not Quite Navy, Melon Mambo
3.  Accessories - Sweet Button Embosslit, Blossom Party Die, Vintage Wallpaper Embossing Folder, Punches, Circles 3/4", 1", 1 1/4" Blossom Petals, Word Window punch, Small Corner punch.

Friday, April 15, 2011

Vancouver Swaps!

This adorable swap was made by Myla Barker.  This card was made using the new Fun Flowers die for the Big Shot.  The Buttons Embosslit was how she made the button for the centre of the flower.  The colours on the card are Rose Red, Chocolate Chip, Always Artichoke, Old Olive, Whisper White

Wednesday, April 13, 2011

Stampin Royalty Challenge #67

This week at Stampin' Royalty we have a theme challenge.  We'd like to see your Spring themed projects.  Hop on over to Stampin' Royalty to check out the fabulous samples from the design team.  I have to admit that I have been absolutely swamped in my personal life.  I had to whip this one up at the last minute.  I used My Digital Studio and some photos I look last spring from my garden.  The thing is that I am sooooooo proud of the blooms in my garden.  That bearded iris - at the top - was a big feature in my back garden bed last spring.  Oh yeah, I am not very good at gardening.  I'm a bit worried as to what I'm going to do with the garden in the new house - 2 1/2 weeks until the big move - gulp.

Tuesday, April 12, 2011

ROAD TRIP!!!!!

Well this page is a real mix of all kinds of stuff.  Of course, it's all made with My Digital Studio though.  I took these cute photos of my kids in California last month.  We were driving from Palm Springs to Legoland which is about a 2 hour drive.  They were soooooo well behaved the entire trip.  In fact, I got to sleep about an hour each way.  We stayed overnight in Carlsbad so that we weren't rushed and had a fabulous time there. (as you have no doubt already figured out from my previous pages about this trip).   At first, I found this colour combination really challenging, but as I worked at this page, everything seemed to fall into place.
The Fun Stuff: - ALL made with My Digital Studio (MDS)
1.  paper - Deck the Halls DSP,
2.  Colours - Cherry Cobbler, Kiwi Kiss, Tangerine Tango, Kraft, White
3.  Stamp Brushes - Sentimental Journey, French Foilage

Monday, April 11, 2011

Vancouver Swaps!

This cute swap was made by Laurel Taylor.  I love how she layered all these types of DSP (patterned paper) to create this interesting and detailed card.  Once she layered it, she ran it through the Big Shot with the Top Note die.  I particulary like how she made the rosette using some Early Espresso Satin Ribbon.
The Recipe:
1.  Stamps - Fundamental Phrases
2.  Ink - Poppy Parade
3.  Paper - Poppy Parade DSP - hostess set, Whisper White, Poppy Parade
4. Punches - Scallop Trim, Scallop Edge, Scallop heart, Modern Label and Word Window punches
5.  Accessories - Top Note Die for Big Shot, Early Espresso satin ribbon, White Organza ribbon

Friday, April 8, 2011

SEW smart silly

 These 2 pages are half of a set that I have decided to post up in my new scrap room when we move at the end of the month - gasp!  Last week, in a frenzy of scrappin' I put together these 4 pages of my children.  I decided to use up my Sweet Stitches DSP, Fabric Designer Brads, and Designer Big Buttons.  I coloured the chipboard with coordinating ink.  I used a few glimmer brads, and Ice Cream Parlour buttons from Sale-a-bration. The buttons were 'stitched' using thin slices of paper.  The orange stitching was made with a needle and some embroidery thread that I found in my stash.