Tuesday, July 5, 2011

Colour Q Challenge #92

 This week we have a cute colour challenge over at Colour Q.  Click here to check out the samples from the Design Team.   To make this page I started with the Sunset Serenade DSP for the background paper.  Next I used the circle punch and filled with pieces of paper.  The tangerine papers are from the new Flirtatious paper.  I then used these adorable photos of my daughter with her brand new bike.  Of course she was wearing a lot of pink, so I changed them to Black and White to fit the colour scheme.

Thursday, June 30, 2011

Stampin Royalty Challenge #78

Sorry I'm late with this post - its the last day of school today and so I've been terribly busy with that, plus a big family wedding this weekend which my hubby is in the bridal party, so there's a lot of scheduling to juggle.  Anyway.  This week at Stampin' Royalty, the challenge is to GO PATRIOTIC.  Friday is July 1st or Canada Day, and July 4 is obviously important to our American friends.  Hop on over to Stampin' Royalty to check out the fabulous designs made by the Stampin' Royalty Goddesses.  I cased a card made by Mary Fish a few months ago to come up with this design.  I'm not 100 percent pleased with the final product, but at least I got to use my 'Glorious and Free' stamp set which has been collecting dust.  The colours in this card are Riding Hood Red, a touch of Cherry Cobbler for the sponging, and Whisper White and Early Espresso Cardstock.  I used several embossing folders and then brayered over the raised side with Riding Hood Red.  Many of the images were stamped twice to give depth to the colours. I also used the Fun Flowers die for the big shot.  Everything was distressed and sponged.

Saturday, June 25, 2011

An Announcement!!!

Well I've been keeping a big secret from many of you out there in Blog land.  I found out a few weeks ago that I am one of this year's Artisan Award Winners from Stampin' Up!  It's a competition held for Demonstrators only.  You need to create 5 cards, 3 scrapbook pages, and 2 3-dimensional items.  My projects from last years entry can be found if you look for the label Almost Artisan, or Artisan Award on my sidebar.  I can't post this year's entries until after Convention in Mid-July.  Aparently they will all be up on a display board.  I'm totally honoured and excited about this.   When I discovered papercrafting I really felt that I had found my medium.  I knew that this was going to be my creative outlet. And Stampn' Up! truly offers a quality product that I enjoy using.  Anyway, I digress.  I am also thrilled to say that one of my good friends has also won this award, so we'll be celebrating together in Utah, at Convention in July.

Wednesday, June 22, 2011

Stampin Royalty Challenge #77


So this week we have an excellent sketch challenge at Stampin' Royalty.  Click here to check out the fabulous creations by the SR Goddesses.    For my card I pulled out some retiring paper and embellishments.  I will miss these rosettes.  The ribbon is also from a reitred Ribbon Originals that I purchased off the clearance rack a little while ago. Anyway, so the cardstock is glimmer gold.  First I made the card and attached the DSP for the background.  I stamped the flourish frame and the sentiment with Soft Suede ink and then carefully cut them out.  Next I mounted them on dimensionals.  I added some ribbon and pearls and voila! a wedding card is born.

Tuesday, June 21, 2011

Colour Q Challenge #90

 
I really like this colour combo at Colour Q this week.  When I saw it I decided to sift through some really old photos for some inspiration.  I came across this one of my husband at 5 years old in his hockey uniform.    Of course I used My Digital Studio.  First I sifted through my dsp and got some Playdate digital paper for the central panel.  I then Stamped digtal images from the Sporting brush set to create my own digital paper.  I faded the opacity for a more washed out look.  Then  I added the banner from Celebrations kit and the medallion and ribbon from the same kit.  Finally I added the buttons to complete the look. Don't forget to hop on over to Colour Q and check out the design team samples.

Wednesday, June 15, 2011

Stampin Royalty Challenge #76

This week at Stampin' Royalty we have an inspiration challenge for you.  The challenge is to use the photo collage on the right for inspiration.   Below you will find close up photos of my sample.


Well I was so lucky to receive my preorder just as I was sitting down to figure out what to make.  I really wanted to make a banner, to reflect the floral banner, and I wanted to pull out the delicate lines of the lacy 'flowers' on the bedspread.  And in my preorder was the new Perfect Pennants die for the big shot.  Putting this banner together was a cinch.  I used the new die, and the Blossom Bouquet Triple Layer punch - currently available in the summer mini.  I used Pink Pirouette, Pretty In Pink, Going Grey and Basic Grey.  I pulled out Rhinestone Brads and Rhinestone Basic Jewels, plus some Taffeta Ribbon in coordinating colours.  I used some retired chipboard letters and Craft Whisper White ink to add the finishing touch.  Don't forget to hop on over to Stampin' Royalty to check out the fabulous work from the Stampin' Royalty Goddesses.


Sunday, June 12, 2011

Sending Springtime Smiles

So here's a cute an simple card made with supplies from the last Occasions Mini.  I used the bird from Nature Walk and stamped it on Watercolouring paper with Staz-On ink.  Then I used an aquapainter and my stamp pads to colour it in.  Using aquapainters on Watercolour paper makes your colouring look sooooooo gooooood.  I'm not very good at this technique on whisper white paper.  The sentiment is from the Easter Blossoms set.  I pulled out my  In Colour DSP and some of the Lap of Luxury DSP and some Basic Black cardstock to finish it off.  What is more springlike than a Robin?

Saturday, June 11, 2011

Almost Artisan

Here is a card I originally made to enter in Stampin' Up!'s Artisan Award contest.  I eventually decided not to enter it because I copied the layout from Kristina Werner and decided that my final cad was too much of a copy.  Click here to see her original card.  So here it is.  I used the Ice Cream Parlour Sale-a-bration kit to create this card.  The rounded edges at the top were made using a template that I created in My Digital Studio, which I then printed and cut out and used like tracers to make the part sof the card.

Friday, June 10, 2011

Enjoy the Little Things

Well I've been really busy these past few days.  I am absolutely IN LOVE with the new papers in the upcoming 2011/12 catty.  I tried and tried and tried to get a good photo of this page, but I just couldn't get the colours to photograph properly.  This page features a sneak peek of a new hostess paper - Cheerful Treat.  The lace circles are cutouts from a new specialty paper called Flirtatious.  I pulled the photo into My Digital Studio and then added the title before I printed it out.  I just love this photo of my daughter.  She has such a sparkle in her eyes in this photo.

Thursday, June 9, 2011

Sneak Peek In Colours

My Pre-order arrived today - hooray!  Here's a cut card that I whipped up.  It is based on a card posted recently by Mary Fish over at stampinpretty.com  This card features two of the incoming In Colours.  The lighter blue is Pool Party, and the darker blue is Island Indigo.  To highlight the flowers in the embossing folder, I started by rubbing my new ink pad over the inside of the embossing folder - use the side where the image receeds so that you get full coverage of the background.  I used matching ink and paper for a tone-on-tone effect.  I tore the edges to reveal some of the inner parts of the paper so you can see the contrast between the inked and uninked part of the paper.  I can already tell you that I love, love, love the new In Colours and I'm really looking forward to more time to play with all the new goodies I got today!

Wednesday, June 8, 2011

Stampin Royalty Challenge #75

This week we have a theme challenge at Stampin' Royalty.  In honour of Father's Day we'd like to see projects featuring Fathers.  Click here to see the fabulous samples made by the design team. 
This page features a photo of me and my dad when we caught a 25 lb Salmon.  I was 9 years old. We did it together on the waters of Howe Sound - just outside of Vancouver.  I remember a lot about this day because Dad and I both rode the fish to the boat.  You see, you need to really tire out a fish this big or it might break the line.  You reel in the fish, and then let the line go free so the fish can swim away, then you reel it back in again.  Well, I think I got tired before the fish did, so my Dad helped me.  We had to run all over the boat with the rod as the fish darted in and around the boat trying to break free.  It was really exciting and it took quite a while until we were able to reel it in.  In the end, Dad brought the fish to the side of the boat and I used the net to catch it.  I just about fell in the ocean when the fish fell in the net and started flipping around.  It is my greatest memory with my Dad.
Anyway, back to the scrapbooking.  I used My Digital Studio to make this page.  I pulled out all the flower images that I could.  I "stamped" each flower in Whisper White and then added a drop shadow in Marina Mist.  It created this interesting layered look.  I changed the colour photo to Sepia because we are wearing some scary 70's colours. 

Tuesday, June 7, 2011

Colour Q Challenge #88

 This week there is a fabulous colour combo over at Colour Q.  Check out the fabulous samples from the design team here. This is my first real paper traditional scrapbook layout for the Colour Q design team.  I usually make my pages with My Digital Studio.  I used the Botanic Garden DSP because it contained most of the colours from the challenge.  I really struggled with my Mojo for this page, and I'm not completely convinced that it's exacly finished, but...

Saturday, June 4, 2011

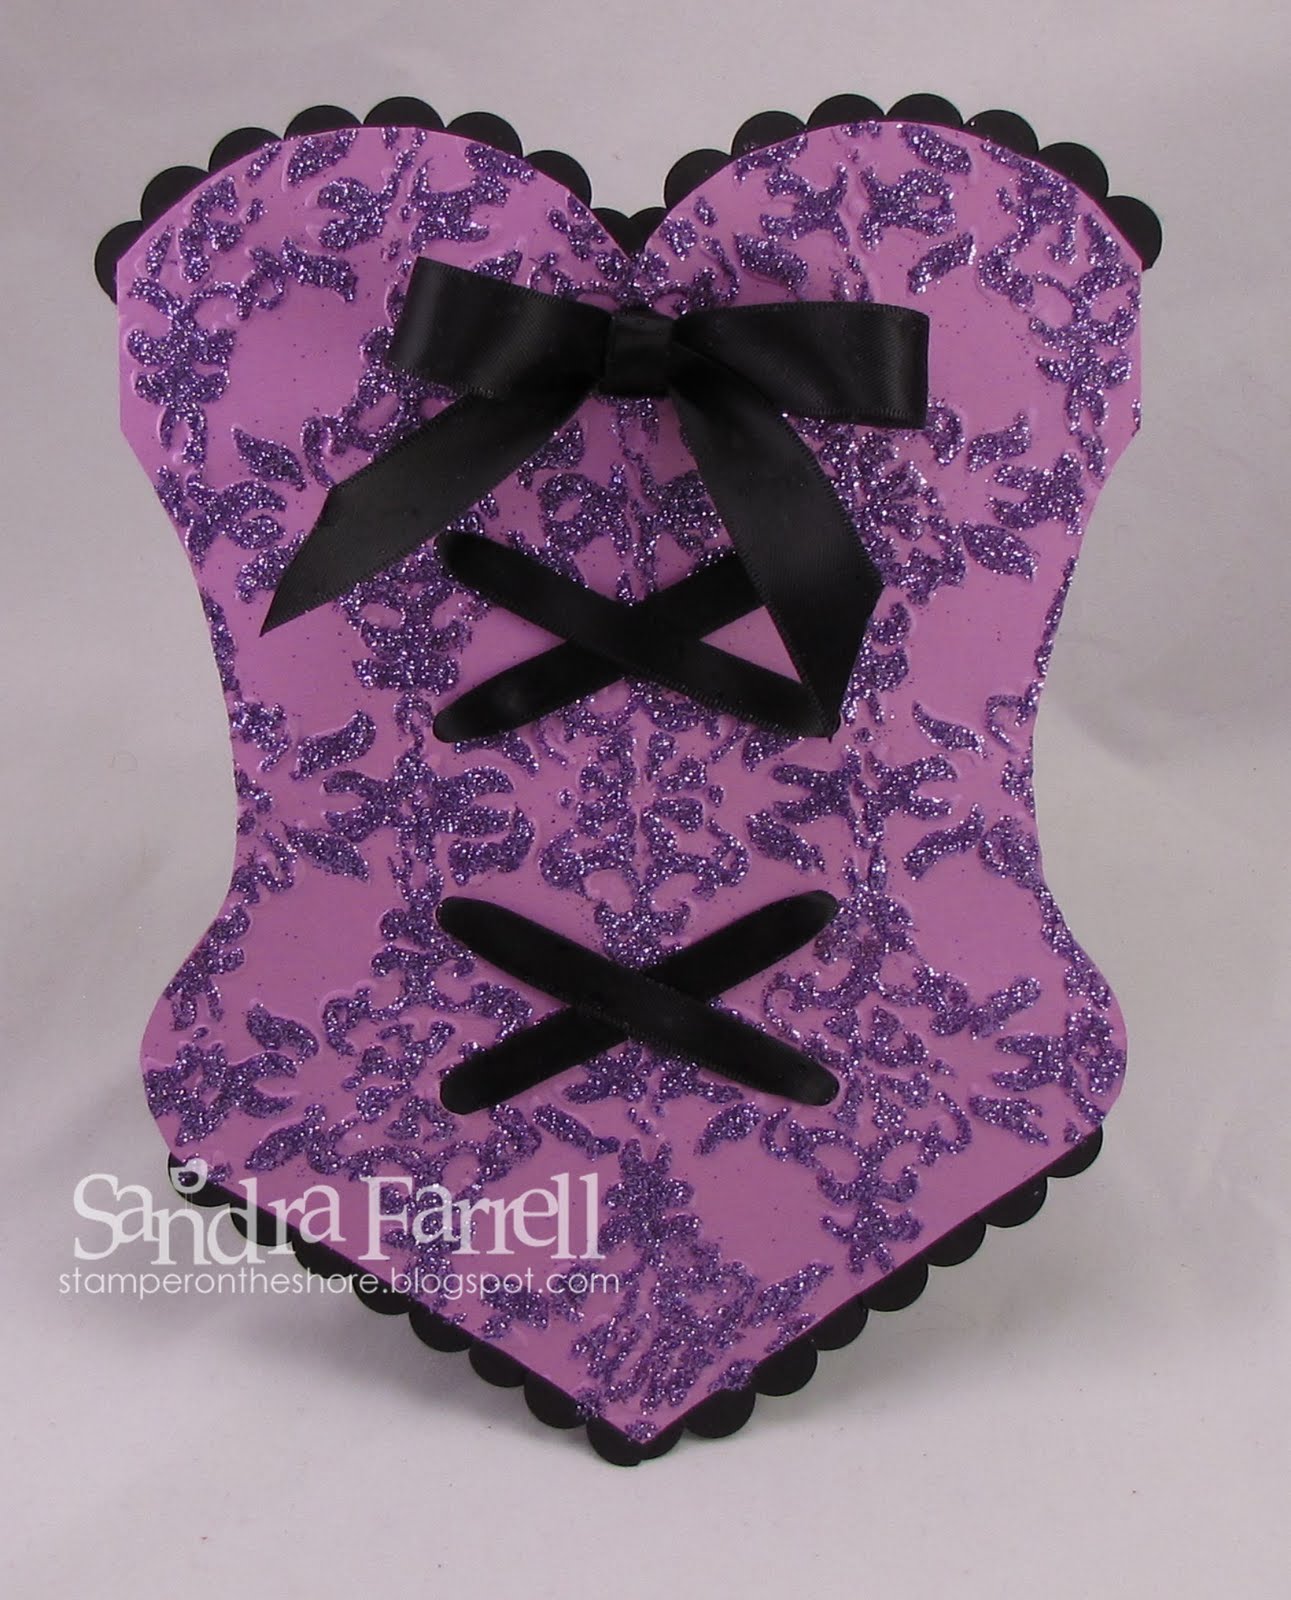
Budding Bustier???

   I was going to entitle this post 'girls gone wild' but then realized that I wasn't talking about girls - when you are over 40 years old, you can hardly be considered a girl - and really, how wild can a Stagette be when the bride in question doesn't drink alcohol??  I decided to make this bustier card to hold a gift card for a "love" shop here in North Vancouver.  It was for my future Sister-in-law's Stagette.  It was a Lingerie party/ stagette rolled into one, and I thought that perhaps I would let her pick out her own Lingerie - thus the gift card. 
    Now I have seen variations of this card over the years, but wound up making my own template.  First I googled 'cards bustier' and got a wonderful You Tube video which showcased a bustier card.  Then I got out my paper and came up with my own template.  Then I ran it through my Big Shot with the Vintage Wallpaper Textured Impressions folder.  Once that was done I used a two way glue pen to add the glitter to the embossed image - it isn't perfect, but I like the effect. The glitter is from my stash.
     I punched the holes with the crop-a-dile.  Then I got out some Basic Black Satin ribbon and folded it in half.  I used sticky tape to hold it in half.  Next I threaded it through the holds and secured it on the back with more sticky tape.  The top ribbon was not folded in half, and tied into a bow. 
     The lacy trim was made using the largest scallop circle punch.  I then cut out the middle, and unrolled it to make this lacy edge - tutorial to be posted soon.  In fact, maybe I'll get organized enough to post up one for the whole card - we'll see...
     Finally I made a smaller cut out of the shape and formed a pocket to slip in this gift card.  Here's the final image.

Friday, June 3, 2011

Bunny Hat Fun!

 I sat down yesterday feeling inspired to create.  I really wanted to use my new paisley petals DSP, so I started looking for a sketch.  When I came upon this week's sketch at Create with Connie and Mary, I decided it looked like a scrapbook layout, so then I pulled out this photo of my kids taken this past Easter.  Well, then I thought, that perhaps, some pastel colours would be really apropriate.    The strips on the left were made using My Digital Studio.  The nice thing about this is that I used the align tool in MDS to made sure I got a perfectly spaced pattern with each stamp.

Wednesday, June 1, 2011

Stampin Royalty Challenge #74


I am horribly late with my posts this week.  My apologies.  It's been a crazy week - what can I say?  This week we have a fabulous colour challenge for you at Stampin' Royalty  Click here to check out the fabulous samples made by the design team.  This week I pulled out a soon-to-be retired hostess set - Birthday Bakery.  It's the first time I used this set, but I definitely will using it again.  It's so darned cute!  In fact, one I had stamped out all the images I decided that I needed to make 2 more cards in order to use them all up.

Friday, May 27, 2011

Still Sew Sweet

These are pages I made a few months ago.  They are part of a set of 4 which I plan to put up in my new scrap room.  Click here to see the other two which I posted a while ago.
I used up my Sweet Stitches DSP, Fabric Designer Brads, and Designer Big Buttons. I coloured the chipboard with coordinating ink. I used a few glimmer brads, and Ice Cream Parlour buttons from Sale-a-bration. The buttons were 'stitched' using thin slices of paper. The orange stitching was made with a needle and some embroidery thread that I found in my stash. 

Wednesday, May 25, 2011

Stampin Royalty Challenge #73


This week we have a fabulous sketch challenge over at Stampin' Royalty.  Hop on over to see the fabulous samples from the Design Team.   I was excited to get to this card because I finally had a chance to break open my sneak peek Paisley Prints DSP from the upcoming 2011-2012 Stampin' Up! catty.  I love, love, love the colours in this paper.  I used Cherry Cobbler, Old Olive, Pumpkin Pie, and Not Quite Navy when I coloured in the stamped image.  I used the Birthday Bliss Stamp Set and cut out the label and mounted it on an oval punched out from Whisper White cardstock, with the Wide Oval Punch.  I popped it up on dimensionals.  I used whisper white satin ribbon for the bow and addd a cherry cobbler button to finish it off.

Tuesday, May 24, 2011

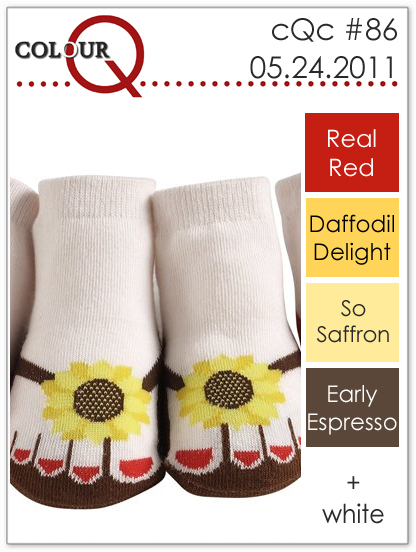
Connor Turns 5 with Colour Q 86


This week we have a great challenge over at Colour Q.  Hop on over and check out the fabulous samples from the Design Team. 
How do you successfully create a multiple photo layout.  I used the nine photo template in My Digital Studio, and then deleted one of the middle photos and moved them around so create a balanced layout.  I started with Early Espresso background paper and then added the Alphabet Letterpress in So Saffron.  Then I reduced the opacity so that it's barely visible.  I decided to add some DSP for the background, so I used the Notable Calendar Designer Paper.  Connor's name was spelled out with the Broadsheet Alphabet Stamp Brush set.  I also added ribbon, pearls, and stitching to finish it all up.

Monday, May 23, 2011

A Quick Card

Here's a quick card I whipped up using the hostess set Birthday Bakery.  I pulled out some retired Wild Wasabi DSP for the background.  The tag image was stamped in Staz-On on Watercolour Paper.  Then I used Stampin' Write Markers and an Aquapainter to colour in the image.  I punched out Daffodil Delight cardstock with the small tag punch and adhered the image to it.  I added some Very Vanilla Grosgrain  and then popped the whole thing up on Stampin' Dimensionals.

Friday, May 20, 2011

Soft Subtles and a Sketch


Today I had the day off!  It was a nice quiet day with no children and no hubby. I did a bit of unpacking and then decided to sit down in my new craft room and create.  This is what I came up with.  I used the sketch from this week's Pals Paper Arts, and I used the colours from Just Add Ink.  I also submitted this into the butterflies challenge at Less Is More.

I dusted off a set I haven't used in a while - Fabulous Friend.  I stamped the butterfly and the frame in each colour and then carefully cut them out.  I folded the butterflies and attached them in the middle.

Wednesday, May 18, 2011

Stampin Royalty Challenge #72

Please forgive me for bragging.  But I really do think they are the cutest kids in the world.  This week at Stampin' Royalty we have a recipe challenge.  We'd love to see your projects featuring birds to celebrate Spring.  My page was made using the recently retired Botanical Gazette paper which has this page that features these two cute robins.  The blue eggs are a real giveaway.  The letters are from the Broadsheet Alphabet letter brush set.  I created the title with My Digital Studio and printed it out.  Then I cut it out and attached it to the page.  The bees, butterflies and birdcage were stamped out on very vanilla and then cut out and popped up on dimensionals.

Sunday, May 15, 2011

Sew Suite Mother's Day Swap

This fantastic swap was MY FAVOURITE swap from Vancouver Regionals.   It was made by Kim Lee.  Check out her blog  http://www.kimspapercandycreations.blogspot.com/
I love how the image was stamped on vellum to create a two toned look.  Below you can see the image when I lifted the vellum up.  This card is went to go to my Mother In Law from my hubby.  Thanks Kim for designing such a fabulous card.

Wednesday, May 11, 2011

Stampin Royalty Challenge #71

This week at Stampin' Royalty we have a theme challenge.  In honour of the past mother's day, we'd like a project featuring Mom's.  Anything from a Mother's Day card, to a scrapbook page, or any other papercrafting or digital project would be fabulous to see.

Tuesday, May 10, 2011

Colour Q Challenge #84


This week at Colour Q we have a fabulous colour combo yet again.  I just love the earthy tones in this combo.  I decided to use the photos from my recent trip to Palm Springs.  I also used some new dowloads from Stampin' Up! that are available in the latest Summer Mini.  Hop on over to Colour Q to check out the fabulous samples from the Design Team.

Saturday, May 7, 2011

Vancouver Swaps!

This cute little swap is from Vancouver Regionals - wow did I get fabulous swaps.  Unfortunately this swap does not have a name on the back so I can't credit the creator.  I know it uses the Build a Blossom set and coordinating punch.  The large Scallop circle die for the Big Shot and the First Edition DSP.

Tuesday, May 3, 2011

It's the first challenge of the month, which means its a colour challenge over at Stampin' Royalty.    Check out the fabulous creations by the design team. 
For this page, I pulled out some photos of my daughter.  Most of the challenge colours are in the photos, so I went from there.  I used my digital studio, and some new digital papers and stamp brushes from the latest Summer Mini. 
The Fun Stuff:
1.  Colours - Real Red, Wild Wasabi, Pacific Point, Rich Razzleberry
2.  Stamp Brushes - Fabulous Florets, Sunset Serenade
3.  Designer Paper - Beyond the Garden
4.  Accessories - Rich Razzleberry polka dot ribbon, Circle Punch, Square Punch

Monday, May 2, 2011

We all reach up high...

OK, I know that I'm scrapping waaaaayyyyy too many photos of Teagan in her toddler dance class, but I just can't get enough of those adorable little girls all in their little tutu's.  Lately, Teagan has decided to 'assert her indepence' like the good tough Viking that she is and has started refusing to participate.  So I had to include a photo of her sitting while the rest of the girls participated.  The poem on the right is the words to a song that Miss Marnie (the instructor) sings with them every week.  It's just tooooo stinkin' cute.  Last week, I actually had to join in the class and dance with her to get her to participate.  It wasn't a pretty sight - I'm a hockey player, not a ballerina remember?