Wednesday, January 30, 2013

Stampin' Royalty Challenge # 161

 It's Wednesday.  That means it's time for another challenge over at Stampin' Royalty.
 
 
This week it's a theme challenge.  Show us your best projects for a
 
BIRTHDAY!!

 
I used the sentiment from You're Amazing. 
I love how big and bold this birthday sentiment is.

 
I used the new Honeycomb Embossing folder and check out those cute little pinwheels.
They are cut using the new little Pinwheel Sizlit.


Tuesday, January 29, 2013

Colour Q Challenge #174


We have a Fabulous colour Challenge for you at the Colour Q this week. 
Hop on over to check out the fab samples by the design team.
 

Muse Challenge #2


Today I thought I'd try out a new challenge blog called Muse. 
Hop on over and check it out.
You need to create a card using their selected muse as your, well, your Muse. 
 
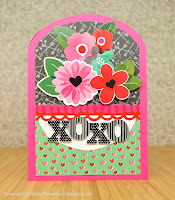
So here's the inspiration that I drew from this fabulous card by Suzanne Dahlberg.  First I looked at the colour palette and found this fantastic paper from Crate Paper.  Some of the colours are different, but most of them are the same as in her sample.    I started to copy the layout of her card, and realized that I actually didn't want to COPY her card, but be INSPIRED by it, so I reversed the layout and put the sentiment on the top and the images on the bottom.  I also was inspired by her "XOXO" sentiment and made a Valentine's Day Card.

 
Muse

Monday, January 28, 2013

A Little Christmas Sparkle

How about a little Christmas Sparkle??
Oh I know, I'm a month behind, but I still have tons of Christmas cards to share.
 
 
I used the 12 Days of Christmas paper kit from My Mind's Eye.
The punch-out embellishments were easy to pop up on dimensionals.
I used the newest Snowflake BigShot die for the little sparkly snowflake
in the centre of the ornament.

 
The sentiment is actually a strip cut from patterned paper.  I popped it up on dimensionals and added Dazzling Diamonds over the Merry Christmas on the left.

Saturday, January 26, 2013

Freshly Made Sketches #70

Well I actually had a chance to sit down this weekend and do a bit of crafting.  This little sketch from Freshly Made Sketches really caught my eye, so I decided to play along.  I really, really, really am not a big fan of Summer Starfruit.  But I have been making other cards with this paper from My Minds' Eye.  Summer Starfruit and Poppy Parade went perfectly so I dragged them out.


I'm not sure if this is a Valentine's card or not.  The colours are definitely non-traditional Valentine's Day Colours.  The patterned paper is from My Mind's Eye, and the upper sentiment is cut from this paper.  The other stamp is a new Sale a bration stamp.  I cut out the hearts with the new Hearts Aflutter and the old Heart Framelits.  I also used the Apothecary Labels framelit.  I also used the hexagon (honeycomb) textured embossing folder.

Friday, January 25, 2013

Wonderful You

I have a nasty habit.
I love to troll the sale bins at crafting stores.
What this means is that I end up with an overwhelming amount of
crafting supplies.
 
 
I found this little embellishment kit from Recollections.
It included the floral backdrop, the ruby embellishments,
and the tiny little bow.
 
I paper pierced around the floral backdrop.
The Kraft coloured matte is from the dollar bin at Michael's.
I stamped the sentiment and carefully cut it out in a banner shape.


Wednesday, January 23, 2013

Stampin' Royalty Challenge #160

We have another great challenge for you over at Stampin' Royalty this week.
It's a theme challenge.  We want you to feature
 
POLKA DOTS!
 
How fun is that???
 
 
I pulled out my new patterned paper pack (Poetry Prints) from the new Spring Catalogue.
 
 
So I came up with this little hot air balloon. 
Do you like those little banners?  I cut them with the banner punch.  
I used a small strip and punched them at the tip of the triangle to make the mini banners.
 
 
And of course the Bitty Banners and matching framelits worked well for the banner.
 

Tuesday, January 22, 2013

Colour Q Challenge #173


Welcome to Tuesday and another combo over at the Colour Q.  This weeks combo is a bit different.  This is such a subtle combination and full of earth tones that I really was out of my element.  But then I remembered this fabulous baby paper from Stampin' Up!  I changed the colour on some of the embellishments, and the background paperj to match the challenge colours.  I made this page to comemorate the birth of my latest nephew.  This little guy is now 2 months old and he's the calmest little baby which is a direct contrast to his older brothers.  He's probably an old soul. 


Monday, January 21, 2013

Darling Sisters

 
This  card took me a surprisingly long time to come up with.
I wanted to try something a little bit vintage, but also wanted to add a lot of colour.
 

I added this little punch out with my butterfly punch,  I LOVE this little punch.
I sponged it from the back side to give the edges a bit more defininition.


A few more die cuts, and stickers and that cool rose ribbon from SU.
 
Anyway, I love the final result.
I hope you do too.


Saturday, January 19, 2013

Tutorial - how to make a cool card


Here's a quick tutorial on how to make this cool card.  The tutorial is by one of Stampin' Up!s concept artists, Christina N.  You can find this card in the Spring Catalogue.


MAKE A

WISH CARD TUTORIAL - by Christina N.


This card is on Page 26 of the Spring Mini Catalogue 2013


I made this card for the 2013 spring catalog. And, since we’ve had questions on how to make it, I’ve made a tutorial.     To get you started, here are some of the things you will need.
1. Take the largest Labels Collection Framelits Die and place it at the bottom of your card front. Using a sticky note to keep it in place, run it only partially through your Big Shot, then roll it back out.


2. Using the Simply Scored Borders Scoring Plate, score along the bottom edge of your card front.


3. With a pencil, trace “Wish” (using letters you have cut with the Big Shot and the Typeset Alphabet Bigz Die) on your card front. Cut out the word using your craft knife. Carefully erase the leftover pencil lines


4. Using an Aqua Painter, splatter the Champagne Mist Shimmer Paint and rubbing alcohol mixture on the card front.


5. Add ticket, “Make a” banner, and the Hung Up Cute Clips arrow to the card.
 

6. Using Stampin’ Dimensionals, add a piece of First Edition Specialty Designer Series Paper to the back of the card front. Tie the dyed Baker’s Twine around the front of the card and finish with a bow.
 

And you’re done!
 

Christina N.
Concept Artist

Friday, January 18, 2013

'Tis the Season for hockey!

So if you are a fan of any sport, you would be thrilled
to find that the season was back wouldn't you?
Well for most Canadians, we're thrilled that hockey is back!!!
 
We've been filling our thirst for the NHL by going to some Junior hockey games here in Vancouver.
 
 
Here's a little page I whipped together after our trip to the Teddy Bear Toss at Christmas time.   It's a charity event where you throw a teddy bear onto the ice when the home team scores their first goal.
They sell the teddies at the game if you forget to bring one.
My kids got to hold on to their teddies for about 5 minutes before our team scored!
The best part is when Santa drove a Zamboni onto to the ice to collect the bears.
there were so many bears it took a huge team of volunteers, 15 minutes, to collect them all.

Thursday, January 17, 2013

Happy Birthday to the Most Beautiful Girl in the World


I'm loving cutting out shapes for negative definition.
What do I mean???
Well, I cut out the heart below and added a little
window to what was below.

 
And I just love that butterfly punch.
I added some pearls for definition.
 
 
I stamped the Happy Birthday sentiment from Bitty Banners and cut it out by hand.
I coloured the edges in Pool Party and added some dazzling diamonds. 
It turned green when it dried interestingly enough.

 
I used the dotted scallop punch from Stampin' Up! to create the ruffled edge.
 
 
That amazing sparkly paper and all the rest of it is from My Mind's Eye,
except for the Early Espresso background.
 

Wednesday, January 16, 2013

Stampin' Royalty Challenge #159

 Welcome to Wednesday and a new challenge over at Stampin' Royalty.
 
 
We have a great Sketch Challenge for you.
Hop on over a check out the fabulous work of the Design Team.
 
 
I pulled out a ton of new goodies from the Spring Mini.  Check out all the little vintage trinkets.   This is an ornate plastic little heart and a mini cupcake liner - sooo adorable right?
 
 I used the sentiment from the Pop Up Posies kit.

Check out these little cuties.  The flower, tea cup, button and lace are from the Artisan Embellishment Kit.  The button is sitting in a little, retro, soda pop top, which is also included in the Spring Catalogue.
 

Tuesday, January 15, 2013

Colour Q #172


Well, I must say that Arielle has come up with a totally challenging combo this week.
I found this combo soooooooooooooo hard to work with.
And I knew I had holiday photos to scrap - so I struggled with these
colours and holiday photos.  But I think I pulled it off.
 
 
Hop on over to Colour Q and check out the awesome
samples from the Design Team.


Monday, January 14, 2013

Happy Birthday Little Boy


This card started with this train sticker. 
It really looked like it belonged on a little boy's birthday card. 
I stamped the sentiment from the You're Amazing stamp set.
 
 
I used the new template to pierce the card in a heart shape, and
then added a kraft coloured heart cut out with a framelit.
 
I hand cut the large cloud, and the little clouds come from the
bitty punch pack.  The strips of paper are from My Mind's Eye.

Sunday, January 13, 2013

Just a quirky little snowman page...


This all started with this cute little snowman picture that I had taken over the Christmas break.


I also really wanted to try out this sketch from Pagemaps.
 
 
Here's my first attempt.  Did you know you can use other products with My Digital Studio.
This paper comes from Pixel & Co. and it's free!  Just hop over
to their webpage and get your own kit.
 
 
I changed the colours up after I decided that the colours in the attempt above, did not match the picture very well.
 
But this got so busy, that I felt like the photo was being lost in all the colour.
 
So I simplified it a bit and used a white background and a few
less embellishments to create the final page at the top of this post.