Wednesday, August 31, 2011

Stampin Royalty Challenge #87

 This week we have a timely challenge for you at Stampin' Royalty.  This week our theme is
 BACK TO SCHOOL. 
And most of us here in Canada are heading back to school on Tuesday.  As a teacher, I always have such mixed feelings this time of year.  Good thing I love my job right!! 
When I saw this stamp set (Recess) in the summer Mini I knew I had to have it, but I need to say that it's now retired as we are about to go live with the Holiday Mini tomorrow.  I love this set, and it was really good for me to work on my colouring.  On these cards I used ink pads and a blender pen for most of it.  I can't seem to find my watercolour paper anywhere, and I just don't have the knack for watercolouring on Whisper White.  Anyway, these were all done on Whisper white with a Blender Pen, and then I used my new frames textured impression folders, and a variety of In Colour cardstock and made the frames for each picture.  The background was stamped tone on tone for a more subtle look.  Scroll down for closeups of each card and a list of supplies at the bottom.


The Fun Stuff:


1. Stamps - Recess

2. Ink – Island Indigo, Soft Suede, Daffodil Delight, Basic Black, Blush Blossom, Peach Parfait, Calypso Coral, Concord Crush, Pear Pizzazz, Wisteria Wonder, Pool Party, Poppy Parade, Pretty In Pink, Blushing Bride, More Mustard, Crumb Cake

3. Card Stock – Whisper White, Peach Parfait, Crumb Cake, Whisper White, Poppy Parade, Concord Crush, Island Indigo,

4. Accessories – Designer Frames Textured Impressions Folder for Big Shot, Black Satin Ribbon

Tuesday, August 30, 2011

Colour Q Challenge #100

This week at Colour Q we are celebrating 100 weeks of past challenges.  This week there's a fantastic sketch.  You need to go back through the Colour Q pallettes and pick your favourite for the sketch.  Don't worry, all the pallettes are shown on the sidebar of Colour Q for easy reference. 

Last week we went to the PNE (Pacific National Exhibition) which is an annual fair here in Vancouver.  One of the highlights of my childhood was riding the Carousel.  The PNE has an old carousel that was around when I was a child.  Last year, my children were afraid of the carousel.  But this year Teagan really wanted a ride.  I was thrilled to go along as I haven't been on it since I was a child myself.

 My page was created with My Digital Studio.  The background paper is from the Sweet Pea DSP.  I layered over a Vintage Overlay in Basic Grey for an aged look.  The frame is from the Downtown Grunge Digital Kit and I also placed a vintage overlay over the photo in Basic Black.  Accessories include Pompom Trim, Sallop Polka Dot ribbon and bow, Paper Daisies, and Playdate Accessories. 

Sunday, August 28, 2011

Princess Party Project is Live

I'm thrilled to tell you that my project has gone live over at Craft Project Central.  This fabulous party collection has everything you need to create that perfect party for your little princess.  This kit includes,invitations, party banner, favour purses, crowns and wands, and a coordinating cupcake, straw, and bottle cover.  Everything you need for your little princess.    I am especially pleased with my cupcake cover that you can see in the photo above. 

Friday, August 26, 2011

Button Buddies for Babies


I was so excited to receive my new stamp set - Button Buddies.  It was on backorder, and I was desperately impatient, as it was the first set I really wanted when I saw the new catty back in June.
Anyway, once I sat down with it, my mojo completely disappeared.  Have you ever had times like that?  I was on the phone today with my fellow Artisan Award winner, Jenn Picard, and we were lamenting about when we have a dry spot of creativity.  And after searching through Splitcoast, and Stampin' Connection, and all my other sources of creativity, I remembered the name of this sweet Australian Demo that I met, briefly at Convention this year, Teneale Williams.  This woman came all the way to the USA with her Mum, (that's how they spell it down under).  They came for something like 4 days - CRAZY.  I know they had a blast.  I actually had a great conversation with her Mum.  They are both very sweet.  So, after starting to check out her blog - click here - I decided to copy one of her cards.  Well...maybe I tweaked it to suit my style a bit.  Teneale's style is one that I would love to learn.  I really don't think I have a signature style and I would love to develop one.  I ususally just get inspired by things that attract me, but I can't narrow it down to a signature style.  Anyway after a lot of time spent looking through Teneale's blog, I decided to case this card here.  I have a friend who is due in a few weeks, and they don't know the sex of the baby, so this card will be perfect.  Something that Teneale always does, is finish the insides of her cards, so I was inspired to try my best at copying that as well.
For this card, I used tons, and tons, and tons of layers.  I think I used half a pack of Stampin' Dimensionals - (kidding)  I sometimes find that if you carefully try to copy the work of a great artist, you learn a lot of fabulous techniques.  Once I started looking very closely at Teneale's cards, I realized how she really loves to layer cardstock.  She always sponges the edges of the top layer, and then matte's it on a sheet of the same cardstock, with just a tiny border so that It really defines the edges.  On this card, I also did my first crinkle ribbon.  My buddy Jenn Picard explained it to me and it's super easy.  You use seam binding ribbon, and you tie your bow (I made a double bow here).  Then you spray it with water from a spritzer, and then you squish it up into a ball, and let it dry.  Voila - crinkle ribbon.  Super easy.
The Fun Stuff:

1. Stamps - Button Buddies, BFF
2. Ink – Baja Breeze, Pear Pizzazz, Regal Rose, Crumb Cake
3. Paper – Paisley Prints DSP, Baja Breeze, Pear Pizzazz, Very Vanilla card stock
4. Accessories – Very Vanilla Seam Binding Ribbon, Scallop Edge Border Punch, Pearls Basic Jewels,

Wednesday, August 24, 2011

Stampin Royalty Challenge #86

 This week we have another fabulous challenge for you over at Stampin' Royalty.  Hop on over to check out the fabulous work from the Stampin' Royalty Godesses.   This week we want you to
 BRING ON THE BLING!!!! 
That means Rhinestones, Glitter, Shimmer Paint, you name it!!!   As my daughter's birthday is this week, and we're having a princess party this weekend, I decided to try out my new Little Princess stamp set and add some of the new Dazzling Details for some Bling.  Of course, in the end I also added some Dazzling Diamonds because I wanted lots of shimmer!  I actually made 4 cards because I stamped the image several times, and then used a blender pen and some reinkers to try out various variations of pinks to make these cards.  I liked all the ones' I coloured, so I decided to use each of them on their own card.  The card above is the one I decided to give to Teagan, the others I'll add to my large stash of cards.


The Fun Stuff!
Stamps – Little Princess, Teeny Tiny Wishes
Paper – Melon Mambo, Pretty In Pink, Pink Pirouette, Rose Red, Whisper White, Retired Pretty In Pink DSP
Ink – Daffodil Delight, – Melon Mambo, Pretty In Pink, Pink Pirouette, Rose Red, Blush Blossom, Basic Black
Accessories – Designer Frames Textured Impressions folders for the Big Shot, Word Window, Wide Oval, Lace Ribbon Border, and Modern Label punches, 5/8” Organza Ribbon, Dazzling Details, Dazzling Diamonds, Retired Pompom Trim, Stampin’ Dimensionals

Tuesday, August 23, 2011

More Weekend Retreat Pages

Here are some more pages from my weekend away.  These pages were sooooooo easy to make.  I inserted the photos and added the text - that was it!!!  Click on the photos to enlarge them and see more details.


Sunday, August 21, 2011

Stampin' Retreat!


Well I just returned from a very fun weekend.  My upline rewards people in her downline who promote every year with a retreat where she pampers you and all you need to do is laugh, drink wine, sleep, oh yeah and stamp a bit if you want.  If you are interested in being eligible for perks like this, sign up to be a Stampin' Up! demonstrator with me and you could be on this fun trip next summer! 
 It was a secret location, which we actually didn't know what or where it was until we got there.  Now of course, when we pulled into the BC Ferries terminal, we knew we were going somewhere across the sea...Well, across Howe Sound anyway.  We drove in the dark for what seemed like hours until we found our way to Stone's Throw cottage.  And it was cute!  I don't actually have a photo of the outside, but when I got home tonight I sat down and scrapped a few quick pages using My Digital Studio and the Downtown Grunge Digital Kit.  I'll share more photos and stories over the next week or so.  I've got a TON of tutorials to try and type up for all of you before I go back to work in 2 weeks - gulp!


Saturday, August 20, 2011

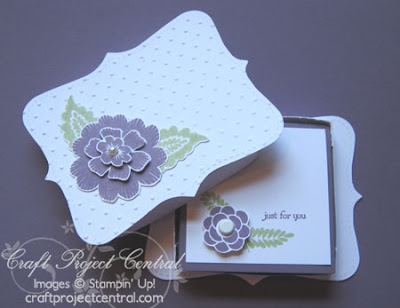
Array of Sunshine Box & Note Cards!

As a special thank you to subscribers Craft Project Central has not one, but two bonus projects for you this month!! Head on over there to check out the details! This cute little project makes a great gift! The box is filled with darling little note cards that the recipient can use, and once the cards are gone it makes a great Post-it note holder too! This project is also a great class or club project!!

To get the instructions for this cute bonus project designed by Laurie, just head on over to Craft Project Central, subscribe to August and meet one of the other bonus project requirements, of subscribing to two or more months in a row, adding the Craft Project Central badge to your blog or referring a friend and when they subscribe, letting them know.

Thursday, August 18, 2011

The Domestic Goddess Scrap 'n Card Kit - NEW

Well I never thought that I would find a use for the Domestic Goddess DSP from the latest Catty from Stampin' Up!  But there was something about the colours in it that really attracted me.  I love, love, LOVE Pool Party.  Anyway the blues and the yellows reminded me of Baby things.  I was itching to scrap this new paper, and suddenly inspiration struck, so voila!  The Domestic Goddess Scrap 'n Card Kit was born.
  
Above you will find the scrap page, and here is the card.  This kit is available for a Boy or a Girl.  I have included all the printables from My Digital Studio as a part of the kit so you don't need to own any stamps or ink to make this page.  All the other supplies are listed in the tutorial.
Fortunately my kids are away for a few days with their Grandparents, so I had time to type this tutorial up.  Don't worry, the Artisan Award Tutorials are coming, I'm just going to have to recreate the projects with current product, so I'll have to come up with a plan for retired items.  But hey, I'm a resourceful girl!  Anyhow, this latest tutorial is part of a new venture for me.  I am going to try to post new tutorials and templates on a regular basis.  For those of you who are new to my blog, if you look along the top there are some tabs that say things like 'Home', 'Templates', 'Tutorials', 'Awards', etc.  On my blog Tutorials are free, and Templates have a small charge because templates take me hours and hours to put together.


So if you're interested please click below to purchase this tutorial template for $3.99 USD

Box Pleat Tutorial:

 This tutorial is based on one developed by Susan Stringfellow.

To make these pleats I scored each strip by one and then by 3. What I mean by this is that I scored some papers at ¼ “ and after another ¾” and then after another ¼ “ and after another ¾” and so on…

For this paper I imagined that one red and one white strip made a whole unit. Then I scored half way through the first stripe and then at the end of the next stripe and then half way through that stripe and at the end of the next stripe and so on…

For this paper I used the scallop trim border punch along the edge first. Then I scored after one scallop and next after 3 more scallops, and then after one scallop, and then after 3 more and so on…


Here's some more views...

When I was done scoring, I folded each paper along the score lines, just like in the photos above. I ran a strip of sticky tape along the back of each pleated paper in order to secure them. You can stitch along them with a sewing machine for a different look.

Wednesday, August 17, 2011

Stampin Royalty Challenge #85

 This week we have a sketch challenge for you over at Stampin' Royalty.  I decided to scrap another photo from my DH's brother's wedding last month.  This photo is of my DH's sister.  The pashmina she's wearing really reminded me of Calypso Coral.  So I decided to use the Berry Blossoms DSP.  Even the Wisteria Wonder seems to compliment the colour of the shadows in the background of the photo.  When I first put this page together I really felt that the lime and coral page with the flowers was TOO bright, so I reduced the opacity of it so that it wasn't so vivid, and I really like the effect. 

Tuesday, August 16, 2011

Colour Q Challenge #98

It's Tuesday and there's another fabulous colour combo over at Colour Q.  This combo totally had me stumped.  I eventually decided to scrap this photo of me on my wedding day.  We got married in Mexico, and many of the buildings are painted these extremely bright colours.  Well, originally I wanted to use this photo because I'm standing in front of a Turquoise wall - yup - TURQUOISE!!  Scroll down for the colour version of the photo.  It's actually a great photo, but once I actually pulled the photo into MDS I realized that it actually clashed with the blues in this challenge, so I decided to change the photo to Sepia to compliment the Soft Suede.  I tried to evoke a vintage feel with this page.  There are TONS of layers. 

Sunday, August 14, 2011

Friends

Here's a page that was SUPER easy to make.  I used the template from the digital DSP Sun Garden.  All I did was plug in the photos and add the text at the bottom of the page.  Nothing else.  This is a page of me and my good friend Jenn Picard who is also an Artisan Award Winner this year, and was my roomate at Convention this year.  The bottom are some silly photos that we took with the front camera on my IPhone as we goofed around during the General Session.  They are very fuzzy from the IPhone, but they show just how much fun we were having.

Coming soon...

Christmas Keepsake Box Card Kit
Coming soon...
Did you get your Christmas Keepsake Box and now you're not sure if you want to create the Box, or make Christmas Cards.  Personally, I love to make cards the most, so I've made this collection of Christmas cards using only the products from the kit and some Very Vanilla Cardstock.  I'll be posting the tutorial this upcoming week.  If you did NOT get the kit, but are interested in the tutorial, I'll include the product list for all Stampin' Up! products needed.

Saturday, August 13, 2011

Artisan Dinner Swap - My Project

Well we've had a ton of fun on this Artisan Award Winner Blog Hop.  Today we're offering you a bonus day to the hop.  When we were in Utah last month for convention, we had a special dinner out with Shelli and her hubby Sterling, and a few of the concept artists at Stampin' Up!  It was a fabulous dinner that went on much longer than planned because we were so busy laughing so much.  Click here for my post on that evening.  Well, one of the things that we organized before Convention, was a 3D or card swap for the artisan winners.  So today we are showcasing our swaps from that dinner.  The thought of swapping with people who had won the Artisan Award was very intimidating.  So I decided to try my hand at something 3D.  I've been eyeing up the fabric and decided to try and use my new Delicate Doilies fabric.  I searched the internet for ideas and came up with this little pouch.  I bought some plain white cotton fabric to line the outside, and a zipper from the fabric store.  I promise that I will post a tutorial about this in the next few weeks (whew! I've a lot of tutorials to post this month!)  Anyway, I made 16 of these 'puppies' in a week.  I used to sew my own clothes a lot so it was just a matter of practice for me to use that old skill and start sewing again.   
Not all of the Artisans are participating in this hop, but here's the list of links for you to check out today.

THE ARTISAN AWARD WINNERS BLOG HOP 2011
1. Connie Collins  
2. Sandra Farrell   (You are here)
3. Heidi King  
4. Heather Klump   
5. Cheryl LeFore   
6. Laura Mellinger
7. Jennifer Picard    
8. Heather Stevens
9. Summer Stone    
10. Heather Summers

Thursday, August 11, 2011

Artisan Blog Hop Day #10


Welcome to Day #10 of the Artsan Award Blog Hop. If you have been following the past few days just skip down to the information below the photo If this is your first visit, let me explain. This years' Artisan Award winners are having a BLOG HOP. We're going to show you all of our winning projects, and let you know a bit about how we made them. If you check out all projects over the whole hop you will see 100 winning projects. So don't forget to stop by tomorrow! Underneath my project, you will find a link to the next blog on the tour, and at the very bottom of this post you will find a complete list of all 10 blogs, in case you get lost on the tour. You should have just come from Connie Collins' blog. Isn't she terribly talented. I love her work.


This project started as a idea on how to use the Petal punch to make paper roses.  The next thing I knew I decided I needed a basket for them.  I played around with the Scallop Envelope box that so many people have made over the years and I decided to 'step it up' a bit.  So I decided to make a 5 sided box instead of the traditional 4 sided.  I also ran the envelopes through the big shot with the square lattice textured impressions folder to make it look woven.   I'll post up a tutorial on how I made these flowers sometime in the next month.  I hope you enjoyed today's project, now hop on over to Heidi King's blog to see her next amazing project.

SUPPLIES:
Cardstock – Baja Breeze, Rose Red, Regal Rose, Pear Pizzazz, Always Artichoke
Classic Ink – Baja Breeze, Rose Red, Regal Rose, Pear Pizzazz
Adhesives – SNAIL adhesive, Sticky Strip, Crystal Effects, Mini Glue Dots
Accessories – Springtime Vintage Designer Fabric, Blossom Petals Punch, Scallop Envelope Bigz die, and Square Latice Textured Impressions Folder for the Big Shot

THE ARTISAN AWARD WINNERS BLOG HOP 2011
1. Connie Collins  
2. Sandra Farrell   (You are here)
3. Heidi King  
4. Heather Klump   
5. Cheryl LeFore   
6. Laura Mellinger
7. Jennifer Picard    
8. Heather Stevens
9. Summer Stone    
10. Heather Summers

Wednesday, August 10, 2011

Artisan Blog Hop Day #9

Welcome to Day #9 of the Artsan Award Blog Hop. If you have been following the past few days just skip down to the information below the photo If this is your first visit, let me explain. This years' Artisan Award winners are having a BLOG HOP. We're going to show you all of our winning projects, and let you know a bit about how we made them. If you check out all projects over the whole hop you will see 100 winning projects. So don't forget to stop by tomorrow! Underneath my project, you will find a link to the next blog on the tour, and at the very bottom of this post you will find a complete list of all 10 blogs, in case you get lost on the tour. You should have just come from Connie Collins' blog. Isn't she terribly talented. I love her work.

I decided that I needed to create a copy of a card that I made last year.  I added more layers and more detail to this card, but essentially it is the same.  I will really miss this stamp. I really enjoyed watercolouring it.  Watercolouring is so simple when you use watercolour paper and an aquapainter.  The frame was made by running the DSP through the big shot in the Tulip Frame Embossing Folder.  IO will be posting a tutorial in the next week on how I did this. Then I used a sanding block to distress it and rub off the outer layer of paper to expose the white core.  I hope you enjoyed today's project, now hop on over to Heidi King's blog to see her next amazing project.

SUPPLIES:
Stamps - Because I Care

Cardstock – Early Espresso, Old Olive, Confetti White,
Other Paper - Blushing Bride Designer Series Paper, Watercolour Paper
Classic Ink – Old Olive, Blushing Bride
Other Ink - Black Staz On, Old Olive and Blushing Bride Stampin’ Write Markers
Adhesives – SNAIL adhesive, Sticky Strip, Stampin’ Dimensionals, Mini Glue Dots, Crystal Effects
Accessories –Linen Thread, Framed Tulips Textured Impressions Embossing Folder for the Big Shot, Pretty In Pink Designer Button, Old Olive 1 ¼” Striped Grosgrain Ribbon, Sanding Block


THE ARTISAN AWARD WINNERS BLOG HOP 2011
1. Connie Collins  
2. Sandra Farrell   (You are here)
3. Heidi King  
4. Heather Klump   
5. Cheryl LeFore   
6. Laura Mellinger
7. Jennifer Picard    
8. Heather Stevens
9. Summer Stone    
10. Heather Summers