Sunday, December 20, 2009
More links
Thanks to those of you who have joined as a follower. I have now added your links to my sidebar. I will continue to do so until Christmas Day. Please pass on the word. I'd like to enter as many new followers as I can into the draw. Please click on the link to the left of this post for more information about this blog candy!
Saturday, December 19, 2009
Cutting Down the Christmas Tree

Here's a page that I whipped up using MDS from Stampin' Up! (That's My Digital Studio - the new digital scrapbooking program from SU) We went down to a tree farm to cut down our own tree. We had a lot of difficulty getting any good photos. The kids were too excited to both look at the camera at the same time, and the lighting in the trees was poor. So I cropped, layered, and covered up to make several collage pages. All of the MDS elements were from the Christmas Jingle Designer Kit.
Friday, December 18, 2009
Stamp-a Stack Card
 Here's a super quick and easy card I made for a former Stamp-a-Stack. I love these little star sequins but they aren't from Stampin' Up!
The Recipe:
1. Stamps: Patterend Pines, Teeny Tiny Wishes
2. Ink: Old Olive
3. Paper: Whisper White, Real Red
4. Accessories: Top Note for the Big Shot, Modern Label Punch
Thursday, December 17, 2009
Another Quick & Easy Card

This card was whipped together using the Accents and Elements from last year's catty. I took some shimmery cardstock and ran it through the cuttlebug with the snowflakes embossing folder, but everything else is SU.
The Recipe:
1. Cardstock: Kraft, Basic Black, Shimmery White
2. Accessories: Top Note Die, Snowflakes impressions folder (cuttlebug), Riding Hood Red Taffeta Ribbon, Accents & Elements Stickers, Stampin' Dimensionals.
Wednesday, December 16, 2009
A simple card
 This card was whipped up using a piece of Old Olive cardstock, the top of a wedding invitation and a sticker of a Christmas Tree. I got the Christmas tree sticker from a Gift Tag last year and I saved it because it is absolutely adorable. The gold embossed square was from a wedding invite and I cut it down and adhered it to the old olive cardstock.
Monday, December 14, 2009
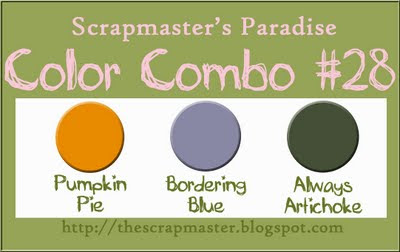
SPCC #28
 This page was made using My Digital Studio from Stampin' Up! My Father-in-law took this awesome photo of my daughter so I just needed to scrap it. I struggled with this colour combo at first, but then I decided to focus on the colour I liked the best which was Bordering Blue. A quick look through the DSP files and I realized that there is no DSP in MDS which has Bordering Blue. So I decided to make my own.
Here's how I did it:
1. Set the background paper as Bordering Blue Cardstock - using the tools on the right side of the project screen.
2. Add the black & white DSP as a page layer using the tools on the left side of the project screen. I used Night & Day. Crop the page layer so it's just as big as the entire page.
3. Reduce the Opacity. I reduced it to 20%. Now it looks like there's Bordering Blue DSP.
After I figured out the background paper I added punches, stamps, and other embellishments to finish the page. Look at the bottom for the recipe.
The recipe:
1. Stamps (Brushes on MDS) Always, Greatest Moments, Best Wishes and More
2. Punches - 5-petal flower, Curly Label
3. Embellishments - Filigre Brads from Hodgepodge Hardware, Buttons from Button Bouquet, Whisper White Grosgrain Ribbon and White Stitching.
Sunday, December 13, 2009
Color Throwdown #72


These 2 cards were made for the Color Throwdown Challenge. Click here or on the photo below to check them out. When I read that this combo was inspired by the Eskimo Kisses DSP I knew I had to try this because I also have that DSP. Of the 2 cards above I absolutely love the top one, and find that the second one is missing something. What do you think?
 The Recipe:
1. Paper: Whisper White, Wild Wasabi, Riding Hood Red
2. Ink: Riding Hood Red, Chocolate Chip
3. Stamps: Tree Trimmings, Christmas Greetings
4. Accessories: Stampin Dimensionals
A little more Christmas


I whipped up these cards very quickly the other night. They are based on this one here that I did for SPCC a few weeks back.
The recipe:
1. Paper: Real Red, Whisper White
2. Rub Ons: Season of Cheer (retired)
3. Accessories: Felt flurries (retired), Rhinestone brads, Silver snoflakes sequines (non-SU)
Saturday, December 12, 2009
Blog Candy Update
Well ladies, I have finally posted my links on the sidebar. I think life is slowly returning to normal. Whew! Although there is one more week until Christmas and not only are my Grade Two's starting to get crazy with Christmas approaching, but My 3 year old son finally understands that Christmas is coming and he's been going crazy lately. Of course, now that my son is excited, my 2 year old daughter has figured out that something exciting is going on. Let's just say that there have been lots of tears and several time-outs around our house lately. But Anyway, I digress...
I'm getting close to 100 followers. Wow. So please click the link on my sidebar to find out about the blog candy. And to sweeten the pot, I'm going to throw in the halloween candy that has not been claimed from October - so good luck ladies!!!
I'm getting close to 100 followers. Wow. So please click the link on my sidebar to find out about the blog candy. And to sweeten the pot, I'm going to throw in the halloween candy that has not been claimed from October - so good luck ladies!!!
Thursday, December 10, 2009
A sneak peek!!!!!
I'm sorry that I haven't posted in several days, but I really needed to get my Christmas cards in the mail. I've also been very busy playing with my new toys. What new toys you might ask??? Well check out the card I threw together today. The stamps come from the current catalogue, but all the other details are listed below...  If you have been following my blog for a while, or if you have been using Stampin' Up! products for a few years, you will know that Sale-a-bration is coming up. What is Sale-a-bration???? Well when Stampin' Up! discovered that February was their slowest sales month, they introduced a promotion where if you spent a certain amount of money you would earn free stamps. Every year they come up with a mini catalogue full of stampsets that you could earn for free. And now it's one of the most popular months to host a workshop. Well this year the mini catalogue includes not only stamps, but also a very cute pack of DSP and an awesome border punch. AND they've expanded the dates so THIS year Sale-a-bration starts January 5 and runs all the way to the end of March. So for every $65 you spent on product, you will be able to choose a free stampset or DSP or punch from the Sale-a-bration catalogue. Thats a whole 3 months to earn free stuff!
As a demonstrator I am able to order from these catalogues before the general public. Oh yeah, I have also been able to order from the 2010 Occasions Mini Catalogue as well. So in the card above are the absolutely adorable mini flowers from the Sweet Pea Stiched felt. These will be available in the Occasions Mini. That heart patterned DSP is from the Sale-a-bration catalogue so you can earn it for free as well as that adorable border punch. It's called the Scallop Trim Border punch and there's a matching corner punch in the Occasions Mini. OOOOhh I can't wait to post for you some of the projects I have been making for you.
The recipe:
1. Paper: Melon Mambo, Chocolate Chip, Whisper White, Old Olive, Pink Pirouette, Welcome Neighbour DSP
2. Stamps: Sincere Salutations, Teeny Tiny Wishes
3. Ink: Chocolate Chip
4. Punches: Tag corner punch, Scallop Trim Border punch
5. Accessories: Polka Dot Grosgrain in Melon Mambo, Mini Library Clip, Sweet Pea Stictched Felt
If you have been following my blog for a while, or if you have been using Stampin' Up! products for a few years, you will know that Sale-a-bration is coming up. What is Sale-a-bration???? Well when Stampin' Up! discovered that February was their slowest sales month, they introduced a promotion where if you spent a certain amount of money you would earn free stamps. Every year they come up with a mini catalogue full of stampsets that you could earn for free. And now it's one of the most popular months to host a workshop. Well this year the mini catalogue includes not only stamps, but also a very cute pack of DSP and an awesome border punch. AND they've expanded the dates so THIS year Sale-a-bration starts January 5 and runs all the way to the end of March. So for every $65 you spent on product, you will be able to choose a free stampset or DSP or punch from the Sale-a-bration catalogue. Thats a whole 3 months to earn free stuff!As a demonstrator I am able to order from these catalogues before the general public. Oh yeah, I have also been able to order from the 2010 Occasions Mini Catalogue as well. So in the card above are the absolutely adorable mini flowers from the Sweet Pea Stiched felt. These will be available in the Occasions Mini. That heart patterned DSP is from the Sale-a-bration catalogue so you can earn it for free as well as that adorable border punch. It's called the Scallop Trim Border punch and there's a matching corner punch in the Occasions Mini. OOOOhh I can't wait to post for you some of the projects I have been making for you.
The recipe:
1. Paper: Melon Mambo, Chocolate Chip, Whisper White, Old Olive, Pink Pirouette, Welcome Neighbour DSP
2. Stamps: Sincere Salutations, Teeny Tiny Wishes
3. Ink: Chocolate Chip
4. Punches: Tag corner punch, Scallop Trim Border punch
5. Accessories: Polka Dot Grosgrain in Melon Mambo, Mini Library Clip, Sweet Pea Stictched Felt
Monday, December 7, 2009
SPCC Combo #27
 Welcome to another SPCC colour combo. This week's combo is one of my favourite. I couldn't wait to use my new Fancy Favor Bigz die for the Big Shot. I combined it with the gift stamp from last year's Deer Friends hostess set. The tag on the handle is cut with the Lots of Tags sizzlits die. The polka dot paper is from the hostess set patterns pack from last year's catty.

Sunday, December 6, 2009
A Little More MDS

I know, I know, I've said this a lot, but I LOVE MDS!!!!!! This is another fall leaves page that I whipped up in a few minutes. The paper is from Cast-a-Spell, and Night and Day. These new digital downloads are available as a separate download from Stampin' Up! I layered the Night and Day paper over the Cast-a-Spell and then lighten the opacity on the opaque setting to make it more transparent. The title of the page comes from the Best Wishes and More stamp brush set. I used the Modern Label punch for the journaling, and the 'together' square is a tag from the Summer Home Designer Kit
Friday, December 4, 2009
Having Fun with MDS
 This page was very simple and very quick to put together. My children were playing around in the leaves at my parents house with my sister-in-law and my nephew. This is one of the photos my dad took. The paper is from Cast-a-Spell. The stamp brushes are Medallion and Enjoy Every Moment. By the way, my children are the two on the right.
Build a Bear Dollhouse is ready to download!!!

Yes it's finally here!!!!!!! You can download the plans for $9.99 USD. I have spent hours and hours getting this puppy ready for you. The directions are clear. There are 11 pages of photos and instructions. All I ask is that you don't share the plans directly, but refer others to my blog to purchase the file. Thanks Ladies for all your support. Once your payment through Paypal is confirmed I will email you the file. I guarantee delivery within 24 hours of payment and most likely it will be sooner.


Thursday, December 3, 2009
Just A Little Taste...
Well I've put in 4 more hours and I'm getting closer to having a final product. The plans should be up on my site by midnight PST tomorrow. Here are some sneak peek photos for you!


Wednesday, December 2, 2009
Build a Bear Dollhouse Update
 Yes, I haven't forgotten. In fact, I've been furriously working on the build-a-bear dollhouse instructions. I think I've logged 12 hours so far. But I'm getting close!!!! I can't say tomorrow, but definitely by Thursday evening I should have it up. Check back on Thursday around midnight and it should be up.
Monday, November 30, 2009
BLOG CANDY TIME!!!!!!!!!!!!!!!!!!!!!!!!!!!
 I'm thrilled to announce CHRISTMAS blog candy. Now this time, I'd like to change the terms for earning an entry into the pot. I am trying to increase my blog traffic, and already, my wonderful followers have been increasing along with my blog hits. To thank all of you, I'd like to let everyone have the chance to earn a spot in the draw.
Here's what you can win.
- Over 30 pages of Christmas DSP from Imagine That,
- Envelopes and Card fronts to make your own cards
- Ribbon
- Christmas Die Cuts
- Sequins
It's enough to get started on next year's Christmas cards, or to scrap your photos from this year.
So here's the deal. In order to earn a spot you need to:
1. Sign up as a follower - if you are already a follower, then you only need to complete #2 and #3
2. Post a link to my blog on your blog.
3. Post a comment on this post telling me that you have linked my blog to yours.
AND
you can earn another spot if you post that link on your sidebar - not just in your main text. PLUS I will post a link to your blog on MY sidebar which should increase the traffic to your blog - so it's a win-win situation for both us us!!! But - because my life is so crazy
This contest will end on Christmas day at 12:00 midnight. Then on Boxing Day I will announce the winner (s) - Oh yeah, I always have extra surprise candy to give away. GOOD LUCK EVERYONE!!!
SPCC #26
 It's SPCC time again. This week's card came together fairly quickly for me. It's hard to tell with the watermark, but the sentiment is actually a rub-on. The red cardstock was cut out with the Top Note die and the lavendar cardstock was punched out with the large snowflake punch. The white snowflake is a felt flurry and I used a rhinestone brad to hold it all together.

Saturday, November 28, 2009
Just a little something...
Sorry I've been away for a few days. I've been sick, writing report cards, and doing stamp-a-stacks and other card making classes. I'll have those PDF files up on my blog in a day or two.

Here's just a little card that I whipped up in a few minutes. I had a blast with this one. I think that I might do this with my Grade 2 class.
Here's the Recipe:
1. Paper - Very Vanilla, Lavendar Lace
2. Embossing folder - Christmas tree from Cuttlebug
3. Bling - stickers from Mike's
Tuesday, November 24, 2009
Christmas House Mini Album

If you follow my blog regularly you will remember a post from late summer that featured a haunted birdhouse mini album. Click here to go back to that post. Well I've been meaning to put together a Christmas one. When I came upon this sketch at Our Creative Corner, I knew it was time. I will be posting a PDF file soon about this project, so if you are interested, check back in a week or so.
Anyway, the album cover is made from the thick cardstock that come as a support for DSP. It's easy to cut and cover with paper. The pages are made from celophane envelopes. And the whole thing is held together with rings which are fed through the holes made by large eyelets.


Subscribe to:
Posts (Atom)