Tuesday, June 30, 2009

Tuesday Tutorial #8

Welcome to Tuesday Tutorial. Today's tutorial will focus on one photo layouts. I had this gorgeous photo of my kids which was just screaming for a scrapbook page.
STEP 1 LAYOUT:
I looked through my scrap maps and came up with this one from http://www.pagemaps.com/
I apologize that it's a bit blurry. One of the things that drew me to this page was it's use of stitching. I have never used the sewing machine on paper before and I decided that this was a great place to start. Another thing I have learned about my scrapbooking habits is that I really need to figure out my colours and then play around with the layout to find a combination that works for me.
STEP 2 - COLOUR:
I find that I am immediately drawn to some colour combinations. This page was really difficult for me. I tried to draw colours out of the photo, but when I played around with them and the picture, I didn't like any of them with the photo itself. Eventually I came up with Chocolate Chip and Sage Shadow and white.
This is an example of the first paper I sewed. I decided to adhere the paper on the cardstock first and then run it through the machine. (much like pinning 2 fabrics together before sewing. I used the zig zag stitch and I used the widest stich so that you can really see that it's sewing. Here's a closeup.
It was kinda fun. I learned that you really need to go slow and steady. Too fast and it's hard to keep the line straight. I also learned that adhering the paper together made it really easy to sew a straight line. I feel that you really need to choose your thread carefully and I really like how this white thread is contrasted on the chocolate chip. I laid the photo out on the sage shadow cardstock and used some retired DSP and some Chocolate Chip DSP for accent paper. Then I attached the layers and sewed on them as I went. It was easier for me to sew each layer and then adhere the next. The title 'LOVE', and the oval sentiment 'you're the BEST' are rub ons. I added glitter with my 2 way glue stick which made the title really POP. Oh yeah, and the Journaling was added by putting the cardstock straight in the printer - super easy. And finally I glued on the buttons with Tombow.

Sunday, June 28, 2009

Rock A Bye Boy

Paper: Chocolate Chip, Bashful Blue DSP. Accessories: Scallop Circle Punch, Satin Organza Ribbon, Sticker from Rock-a-bye Boy, Stampin Dimensionals

Saturday, June 27, 2009

A Sneak Peak!


This card features a sneak peek stamp set from the new Catalogue. One of the exciting things about being a demonstrator is the fact that we have access to new product before the general public. This card was my swap for Sea To Sky stampers this week. The colours in this card were a real stretch for me. They are completely out of my comfort zone, but I really like how they turned out. Stamps: On a Pedestal. Ink: So Saffron, Perfect Plum, Rose Red. Paper: Perfect Plum, Whisper White, Walk In The Park DSP. Accessories: Rose Red & So Saffron Grosgrain, Eyelet Border Punch, Stampin' Dimensionals, Dazzling Diamonds Glitter.

Thursday, June 25, 2009

Let the cute begin!

Paper: DSP from DCWV, Chocolate Chip. Accessories: 2 way glue pen, dazzling diamonds glitter, stampin write markers, signo white gel pen, deckle scissors, ribbon from Mike's, stampin' dimensionals.

Wednesday, June 24, 2009

50th Anniversary Fun!


I had a blast making this card. It's for my mom. One of her friends' 50th anniversary is coming up. I apologize that the photo is a bit dark. This card is a bit of a jumble of stuff. I was inspired by this card here. I decided to use Quilt Quips because my mom is a huge quilter and I knew her friends were too. So I took the original card, and deciced to try sewing on my machine. I found that the zig zag stitch worked best and the white thread was definitely the right choice.
Stamps: Quilt Quips, Congrats, Oval Monogram Stamper (Just Rite Stamps). Paper: Whisper White and DSP from Karen Neunberg. Ink: Sage Shadow, Creamy Caramel, Basic Black, Pretty in Pink. Accessories: Stampin Dimensionals, Wide Oval Punch, Scallop Oval Nestabilities, Sewing Machine, Modern Label Punch, Blender Pens, Ribbon from Mike's.

Tuesday, June 23, 2009

Tuesday Tutorial #7

It all started with this gorgeous photo of my son taken on his 3rd birthday. I know, I know, I'm bragging, but isn't that a mother's perogative? Anyway, I had this beautiful photo of my son and it was just screaming for a scrapbook layout. SO... I decided to try my hand at a layout challenge at Lotus Papiere. This brings me to my first step

STEP 1: LAYOUT
So I used the layout from Lotus Papiere as a starting point. The whole point of a sketch is to make it your own. So with that in mind, I decided to try to work on getting my colours in order which led to step 2.

STEP 2 COLOUR

I really liked the colour of my son's shirt. It's a big focal point of the photo. So I tried to use a contrasting colour in order to allow his shirt to 'pop'. Sometimes I try to draw the colour out of the photo, but this time I went in another direction.


After several attempts at colour to matte the photo on (see above)  I chose Tangerine Tango as my background. This colour really contrasted with the colours in the photos. Next I found a coordinating piece of DSP in which to draw the colours from. (it's actually the reverse of the background paper).


We have, Chocolate Chip, Old Olive, Tangerine Tango, and Bashful Blue. So I pulled out my accessories and cardstock which matched these colours. Then I focused on how to matte the photo. I knew that I liked it on Tangerine Tango, so that was a natural for the first colour. I didn't have a lot of paper left, so I was limited to my DSP and a small scrap of cardstock. So I matte'd it on the DSP.


Then I added several layers until I was satisfied with the 'look'. I believe it's matte'd on 6 layers of cardstock and DSP.

STEP 3 - Back To LAYOUT!

So after looking at the sketch again, I decided that I needed to put the photo on the right side of the page because it's always a good idea to have more space on the page in the direction that the subject is facing. So I decided, based on the direction that he was facing, that the photo needed to be on the right side of the paper. SO... I rotated the sketch 180 degrees.

STEP 4 - ACCESSORIES:

So after faffing around for a long time, I decided to use the Choo Choo stampset to complete this page. The image was actually taken on Connor's real birthday and not at his birthday party, so I wanted the page to reflect his interests (trains) and yet, not show a stereotypical birthday party kind of layout, as this photo was not taken at his party.


After some time, I decided to incorporate images from "Best Wishes & More" because I wanted images that were bold and strong, not outlines of images. So above you see a photo of me playing around with the layout. Next I decided that I needed ribbon and a sentiment. I used the sentiments from Best Wishes & more and the bitty birthday sentiment. Finally I stamped the bottom sentiment with some little abc stamps I got from Mike's. But the short order alphabet stamps from SU would work great instead.


So here's the final page. It's kinda cute - just like that little guy in the photo!!!! 1 3/4" circle punch.

Monday, June 22, 2009

Mojolicious 92

Ahh another Monday and another Mojo Sketch. I went to Mike's this evening and I told myself I would NOT buy any paper, just adhesive. But I found these metal edge tags and floral wrapping paper on sale. I couldn't resist. I love the colours. They are all very close to SU colours. Anyway, when I got home, I looked at the sketch and decided that this was going to be the paper for my Mojo card. I made this card for my teaching partner as tomorrow is my last day with my class and she teaches the rest of the week with them, so pretty much tomorrow is my last day of work for the school year - yay! And tomorrow will be my last chance to leave her a 'thanks for being such an awesome teaching partner' gift!

This second photo shows the colours much better.

Stamps: Soft Summer. Ink: Purple Staz On, Paper: Whisper White, Lavendar Lace, Flat wrap from Autumn Leaves. Accessories: Metal Edge Tags from Making Memories, Ribbon from Purdy's, Rhinestones from Colorbox, Stampin' Dimensionals.

A 20 Page Scrapbook!!!!!

Would you like to make this 20 page scrapbook?? In this class we would make 20 6x6inch pages. The pages are 6x6 and you will make 20 of them for only $30. Plus, as an added special, you can order a 6x6 scrapbook from me for only $25 including shipping & tax. (an almost 20% saving)

Sunday, June 21, 2009

Selling off retired stamps!

I'm clearing off my shelves to make room for the new catty - I can't wait until July 1st - my wishlist is filling up fast! Let's face it - as a SU demonstrator I get great deals and lots of free stuff. And I'm feeling very overwhelmed by the amount of stamps that I have. So I've gone through and culled the pack - believe me, I love these sets, but I only have so much room and there's tons of new ones coming out. Below you will find a selection of already retired sets that I am selling now - and on July 1st you will find a list of newly retired sets that I will also be selling.
Above you see...
Punches Three - retired level 1 set - mounted and slightly used - $10 - great set - fits scallop square and wide oval punches
On The Spot - background stamp - mounted and slightly used - $10 - goes well with seeing spots - see my other posting
Fall Flair - retired level 1 stamp set - mounted but not used - $20 - 2 step stamping, great set!
Too Terrific Tags - fits small tag punch - mounted and slightly used - $15

Above you see...

Sweet Thing - matches retired simply scrappin - Special Delivery Boy and Girl - mounted and slightly used - $15

Best Yet - great set for card sentiments - retired level 1 set - mounted and slightly used - $15

Seasonal Icons - part of retired level 3 hostess scrapbook kit - $10 - or what's left of the kit - rub ons and paper and stamps $15

Yummy - retired Sale-a=bration - mounted and slightly used - $12

Lots of Thoughts - retired Sale-a-bration - mounted and slightly used $12

Above you see...

Make It Count - retired level 2 set - mounted - used once - $15

Birthday Whimsy - retired Sale-a-bration set - mounted and slightly used - $12

Friendship Blooms - retired SAB set - mounted and slightly used - $12 - partially used matching rub-ons $5 - or both for $15

Time Well Spent - retired level 3 set - mounted and used once - $30 - GREAT set for watercolouring

Happiness Always - retired level 3 set - mounted and slightly used - $30 - 2 STEP stamping - great set.

Saturday, June 20, 2009


As you can see from my blog title photo, I have redone my favourite card in the new In Colours. I absolutely love them!!!! This card was originally featured on my blog here and inspired by this card here.
Stamps: Best Wishes & More. Ink: Rich Razzleberry, Bermuda Bay, Melon Mambo, Paper: Rich Razzleberry, Melon Mambo, Bermuda Bay, Whisper White. Accessories: 1 3/4" and 1 1/4" circle punches, half pearls

Thursday, June 18, 2009

Mojo Scrappin'

I really wanted to put this photo in my shadowbox collection. It's a great photo of my daughter and I on my birthday last weekend. We had a family picnic and a fun boat ride. I just got a shipment of my new In-Colours and decided to try out the new paper and ink. This paper is from a new level 3 hostess set It's an all SU card except for the pink ribbon and flower. This layout is based on the latest Mojo sketch 91. Below you will find the sketch. I flipped it upside down and, of course, changed the dimensions to fit a 8x8 scrapbook page.

Paper: DSP from Lovely Flowers bundle, Rich Razzleberry, Whisper White, Melon Mambo. Ink: Rich Razzleberry, Melon Mambo, Old Olive. Stamps: Flower Lines. Accessories: Lovely Lines Rub-ons, Large Oval and Scallop Oval Punches, Stampin' Dimensionals, Corduroy Brad, Fabric flower and Pink Ribbon from the dollar store.

Special Delivery


I will really miss this simply scrappin' kit. And I will really miss Kiwi Kiss. I absolutely love the colour combo on this DSP. This card was made using the Rock-a-bye Girl kit.
Paper: Rock-a-bye Girl, Kiwi Kiss, Whisper White Accessories: Kiwi Kiss satin ribbon, Stampin' Dimensionals.

Tuesday, June 16, 2009

Tuesday Tutorial #6

Welcome to Tuesday Tutorial. What follows is the layout that inspired me to start Tuesday Tutorial. As I was making this layout, I decided to photograph each step for my blog and then realized that I could make this a weekly feature.
So here's the layout in its' finished form. I apologize for the 'crappy' photography. I decided that I wanted to create a layout using a bunch of photos that I took driving around the complex we were staying in. The thing about Palm Springs is that it's such a contrived environment - who decides to build 18 million golf courses in the desert???? We were staying in a complex that had over 1000 units and a full 18 hole golf course and 19 outdoor swimming pools. And this complex is only one of many in Palm Springs. So one day as we were returning to our unit, I decided to photograph the entire drive in from the passenger seat. So the photos are not anything special. So what to do when creating a multi-photo layout?

I decided that I really wanted to use the Petal Party Simply Scrappin' kit in order to expedite the process (what a joke that turned out to be as you will soon find out) The cardstock and DSP all coordinate which means you don't need to spend time fussing with matching up colours. So I took out the cardstock and laid all the photos on it and chose a colour to matte them all on. Matting them all on the same colour simplifys things and allows me to use busy'er cardstock in the layout.
After laying them all out, I decided that Pumpkin Pie was perfect as a background as it didn't detract from the colours of the photos.After matting all the pictures I placed them on DSP from the kit. The first page was still very busy on this Old Olive coloured DSP, so I placed a plain piece of 8 1/2 x 11 inch cardstock on it to reduce the busy background, but still allow for a big contrast with the photos. Page 2 of this layout was started on So Saffron cardstock. I then decided to add a strip of DSP. I really didn't want to show a lot of the Pink flowers, so I tried many layouts until I was happy. I finally decided to focus this page around the view of the golf course. I placed the photo in the middle of the page and popped it up on dimensionals for depth.
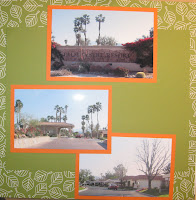
So why did it take me so long to publish this layout? Well, I decided to use the chipboard letters that I had received at regionals to make the title. And I decided to ink them up with the colours of the photos. But after deciding that the so saffron didn't work well on the grey chipboard, I decided to ink them up with white craft ink, and when that had dried, sponge on some other colours. What I failed to realize was that craft ink takes FOREVER to dry. How long you might ask? Well, 2 weeks later it was still tacky. Yes, that's right - 2 weeks later!!!! So I decided to try sponging on the colour and - well it turned out pastel. And this kit has BOLD and BRIGHT colours, so a pastel coloured title was not acceptable. So I tried to dry it with my heat gun, and it just stunk up my craft room. So I left it for ANOTHER week, and...still tacky. So, in desperation I decided to heat emboss with white embossing powder, and below you see the results. I'm not very happy with the title, but I love the rest of this layout. All of the flowers are stickers form the kit and several are popped up on dimensionals for depth. AND Petal Party is NOT retiring so look for it in the new catty in July!

Friday, June 12, 2009

Am I crazy????

I'm horribly nervous. I've booked a table at the White Rock Baby & Toddler Fair. It's all very last minute but it's my very first vendor's show. I've been super busy the past few days putting together scrapbook pages and cards to sell. My focus at this fair will be on Cardstalk Designs, not Stampin' Up! as there will be another SU demo there too. But you know me, I LOVE papercrafts. And I have tons and tons of stock to sell. So if you're in the area it's tomorrow from 11am to 3pm. $5 for grown ups and kids are free!

Thursday, June 11, 2009

Tulipe Delight


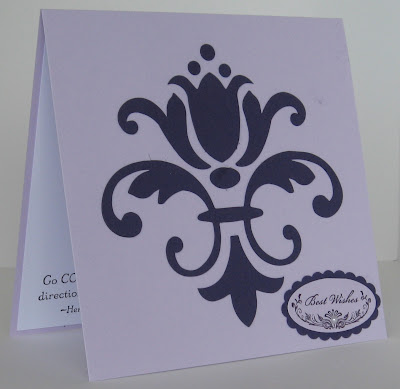
I made this card using the Tulipe Bigz Die for the Big Shot. I loooooooove my Big Shot. This card was so incredibly easy to make. I ran the Eggplant paper through the Big Shot and then laid the outline down on the card and put glue on the little pieces to put them in place, and then I removed the outline. This card was made for a colleague who is moving to a new school. Ink: Elegant Eggplant, Stamps: Live Your Dream, Oval All. Accessories: Tulipe Bigz Die, Scallop Oval Punch, Large Oval Punch, 1/2 pearl,

Tuesday, June 9, 2009

Mojo #90

Well here I go again. I'm trying to complete the Mojo Monday challenge every week. This week's layout I found difficult to work with. I wasn't very inspired because I felt it was a bit 'unbalanced'. But, once I turned it on it's side, things seemed to fall into place for me. I've had this DSP for a while, and haven't done anything with it. So I pulled it out to see if it would inspire me. The colours are a lot softer than I'm used to working with but I'm happy with the result.
Stamps: Merci - sale-a-bration '08. Ink: Baja Breeze, Sahara Sand, Soft Sky. Paper: Parisian Breeze, Baja Breeze, Kraft, Whisper White. Accessories: 1 1/4inch and 1 3/8 inch circle punches, scallop circle punch. Stampin' Dimensionals.

Tuesday Tutorial #5

Welcome to Tuesday Tutorial. Today we are going to make an 8x8 scrapbook page. I'm going to start with the completed page today so that you have a reference. Unfortunately most of the pictures I took along the way were not clear enough to post, so I apologize in advance for the small number of photos.
I absolutely love this photo of my son picking the winner of my 5,000 hits blog candy. I knew I wanted to make an 8x8 page for my shadow box collection. And those trains I made a few weeks back seem so appropriate for my Thomas the Tank loving little guy.
STEP 1 - COLOUR I knew that I wanted to use bright colours and I tried to pull the colours from what was in the picture. So I started with the Bold Brights pallette. Glorious Green and Green Galore fit the picture perfectly. but Real Red just didn't go properly. The tablecloth in the background was much closer to Riding Hood Red, so I decided to use that instead. And the blue is Brilliant Blue.
STEP 2 - LAYOUT I found this layout in June's Stampin' Success. This is a fabulous magazine that only demonstrators can get. I really like the way the top note die is incorporated into this layout. It's important when you look at the layout you try to ingnore the colours and just focus on how the page elements work together.
So from this layout I took the elements of picture position (on the left side of the page), the Top Note Die Cut on the right, the scalloped edge on the left and the fact that the photo is mounted on a contrasting colour. I had to add a bit more at the bottom because this page above is a 6x6 and I wanted to make an 8x8. So the train tracks and trains that I added to Connor's birthday page.

Monday, June 8, 2009

Sunshine Garden in Palm Springs

Boy am I sad to see that the Simply Scrappin' Kit Sunshine Garden is gone. It was on the Last Chance List and now it's sold out. I'm really happy that I stocked up though, and I will be able to offer this layout in an upcoming class. This particular layout is from our trip to Palm Springs. It was super easy to make. I just cropped al the photos the same size and laid them down on a piece of 12 x12 DSP and then made sure the borders were even, and glued them down and cropped the paper. Then I decided that the top right corner needed "something" so I enlarged the picture of myself and Teagan and cropped it to only show the fantastic smile on her face. The flowers are all stickers from the kit and I popped them up with dimensionals. The rhinestone stickers in the flowers are from Mike's.

Paper: Sunshine Garden and Sale-a-bration DSP. Baja Breeze Accesories: Stickers from Sunshine Garden bulk buy, and ribbon from Sale-a-bration.

Sunday, June 7, 2009

Little Rory's Card

So here it is as promised. My newest nephew's welcome card! I decided to use chocolate chip as the basis of this card, so I needed to insert a scallop note inside for something to write on.
I played around a lot with this card until I was happy. I knew that I wanted to use the scallop sentiment, but then I stamped, I cut, I layered... until the final result was done. I decided to make the mounted borders small to emphasize the polka dot DSP

Stamps: So Many Scallops, Ink: Chocolate Chip, Barely Banana, Bashful Blue. Paper: Bashful blue DSP, Chocolate Chip, Whisper White, and Bashful Blue cardstock. Accessories: Scallop circle, 1 1/4' circle and 1 3/8' circle punches. Satin Ribbon from Occasions Mini, Scallop Note in Wild Wasabi

Saturday, June 6, 2009

Have you ever????

Have you ever simply fallen in love with a card or scrapbook page? Maybe I'm a bit of a freak, but I am completely addicted y'know. Anyway, when I first found this card on splitcoast, I was completely enamoured. I didn't have the grommets or the circle tag to copy the card exactly and I decided to see what I could come up with. Above you see the final product. You've probably noticed it on the header of my blog. I put this card up on display in my craft room and I just can't stop looking at it. (Is is narcissistic to love something you made?) I will be soooooooooo sad when these In Colours are gone. But yet, I can't wait to make this card again with the new In Colours when they arrive. Stamps: Best Wishes & More. Ink: Riding Hood Red, Baja Blue, Kiwi Kiss. Paper: Riding Hood Red, Baja Blue, Kiwi Kiss, Whisper White. Accessories: Circle punches and half pearls

Friday, June 5, 2009

Simply Striking

Isn't this card great? It's very simple to make and the colour contrast makes it very striking. I got the inspiration for this card from my upline Angela. You can find her blog here. This card was made for a colleague of mine who is ending her position at my school and doesn't know where she will be in September yet. Thus I felt the quote from Theroux was appropriate. I chose 2 types of purple to make this card. It's a 5 1/2 by 5 1/2 inch square.
Stamps: Live Your Dream, Oval All. Ink: Elegant Eggplant, Chocolate Chip. Accessories: Tulipe Bigz Die, Scallop Oval Punch, Large Oval Punch and 1/2 pearl.